Thursday, October 31, 2013

From Ballerina to Cinderella - A Costume Transformation!


The clever girl was in a dance recital this summer, and had THREE, yes THREE different costumes.  I decided then and there that one of those costumes would have to be re-purposed for Halloween in some way!  So, when the clever girl said she wanted to be Cinderella for Halloween, I thought, "PERFECT"!  I knew that her blue ballerina costume would be just right.

So I lugged that tutu to the fabric store to pick out some matching fabric, and found a satin and some sort of shimmery organza-ish fabric for an overlay.  I also picked up some white satin with some silver sparkles for those weird hip things Cinderella has on her dresses.  What are those things, anyway?  What woman in their right mind wants some sort of accent to their hips??

I was so intent on getting this costume created that I neglected to take any photos along the way.  However, hopefully I can explain what I did in case anyone else out there wants to create a Cinderella costume someday! 

For the skirt, I knew I would put it on elastic and it would be worn OVER the tutu part of the ballerina costume.  The tutu would give it the ball-gown body.  And the skirt had to be very twirly, of course.  The clever girl is 25 inches from waist to foot.  I needed enough length to hem the bottom and to encase a 1 inch elastic for her waist.  I used about 1 1/2 yards of the blue fabrics for the skirt, and cut those fabrics into two pieces of 3/4 yard each.  Thus, there were two pieces of the blue satin that were 3/4 yard and two pieces of the blue sparkly fabric that were 3/4 yard.  I sewed the selvages together to make a gigantic tube of each, separately. 

For the bizarre hip things, I used 1 yard of the white fabric, and cut it in half to make two pieces, 1/2 yard each.  I rounded the corners of those rectangles so they looked like two big half moons.  I did an overlock (serge type stitch) over the curved edge, turned it under, and sewed it flat.  Hem done!

Then I stacked up my blue skirt fabrics:  blue satin on the bottom and blue sparkly on top.  I pinned the white pieces on top of the skirt, so that the middle of each moon met the seam of the blue pieces.  This way, the seams would be on the sides, not on the front and back.  Get it?  And I did an overlock stitch all the way around, catching all those crazy wisps of these fabrics.  I folded this edge down 1 1/4 inches and sewed near the edge, leaving an opening for the elastic.  String in the elastic, close the opening, done!  The blue skirts got a simple "sort-of" 1/4 inch rolled hem.  I say "sort-of" because I didn't measure one darned thing, I just folded the fabric over twice as I sewed it all the way around.  It is probably terribly uneven, but hey, it is a Halloween costume!  Skirt, done.


Now for the accessories:  In my online perusal of Cinderella costumes, I saw that Ashley of Make It & Love It made gloves, a choker, and a headband for her little Cinderella.  I would have probably forgotten these very crucial elements if not for her!  I didn't actually look at her blog when I made the accessories, but we pretty much did them the same way.

For the gloves, I measured the clever girl's arms in three places:  length from bottom of middle finger to upper arm, circumference of upper arm, circumference of wrist.  Then I just made a pattern that took those measurements into consideration - I knew I would cut the fabric on the fold and one end should have a point to attach to her middle finger.  Thus the length of the pattern was the same as the length of her arm from finger to upper arm, and the widths were about an inch (total) bigger than her wrist/upper arm measurements.  It looked something like this: 


I cut two each from both blue fabrics, placing the longest side (with the finger point) on the fold.  I overlocked the point end and the upper arm end, sewing a blue satin fabric to the blue sparkly fabric.  Then I folded the glove right sides together and overlocked the edges together.  I sewed a small loop of elastic at the point to go around the clever girl's finger.  Done.

The choker is a rectangle of both blue fabrics made into a tube that is a couple inches longer than the clever girl's neck circumference.  I sewed velcro to the ends to put it on/take it off.

Finally, the headband is another tube, though this one is angled down at the ends a little bit. 

Something like that.  I attached a piece of elastic to each end to keep it snug on the clever girl's head. 

And, her costume was done.

And, she LOVED it!

She spent lots of time looking in the mirror!  

 And then she turned right into a princess!

 But pretty much, she couldn't stop TWIRLING!

 and DANCING!

 and SPINNING!

 She loves her Halloween costume!

Oh, and in case your are wondering, of course the clever baby had to get in on the action as well.  You can't have a Cinderella without a Prince Charming, can you?  And who (in my world anyway) is more charming than the clever baby? 

 Yes, indeed, I did do that to my little guy. 

But seriously, is he handsome, or what?

His easy, peasy costume consists of some red knit pants and a grey/silver jacket that I found at a consignment shop.  I bought some gold braid, some gold fringe, and some gold rope and went to town.  I sewed the gold braid down each side of his pants.  Then I made little epaulettes with dark red felt and glued the fringe around three sides underneath and the gold braid around the four sides on top.  I sewed these to the shoulders of his little jacket, looping a piece of gold rope from one shoulder to the other, and another loop around his arm.  You can't see that too well on the photos, but it is under the arm closest to Cinderella. 

And here you go, Cinderella and Prince Charming.

So cute, I could eat them up!
Happy Halloween!


Tuesday, October 29, 2013

TWD: Baking with Julia - Raspberry-Fig Crostata

This month has 5 Tuesdays, so we have an extra week for our Tuesday's with Dorie posts!  It is sort of a catch-up week for those of us who might have missed a recipe, or maybe a re-do week if there was something we wanted to try again.  For me, it is a catch-up week.  Back in August, we had a week where we could do a choose-your-own-adventure recipe, in that there were two recipes suggested and we could pick which one we might want to make.  Personally, this was stressful as I don't want to miss any recipe and I knew that I wouldn't be able to make both recipes that week!  Ack!  So I actually made this Raspberry-Fig Crostata a week later and set the photos aside to post at a later date.  And that date has finally come!

By the way, as a side note, do you recall the choose-your-own-adventure books from when you were a kid?  I LOVED those things.  I would read them again and again, trying to figure out every permutation of choices to get to the different endings.  I will have to find some of those books for the clever girl... Don't you wish life could be more like a choose-your-own-adventure book sometimes?  In that if you start down one path and you don't like the consequences, you could say "re-do", jump back a few pages/days/months and make a different choice?  Sometimes we actually can to that, but many times, once a choice is made we just have to deal with the developments that come.  Sort of like that movie "Sliding Doors" with Gwyneth Paltrow from the late 1990s.  Have you seen it?  I loved that movie.  Still do, when it comes down to it! 

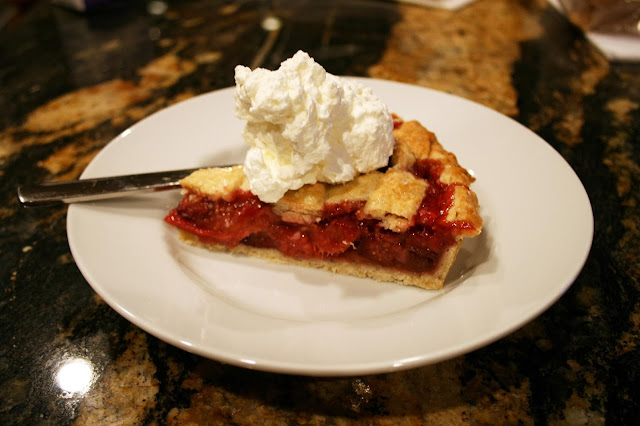
Anyway, on to the recipe!  This crostata, aka TART or PIE has a sesame-almond dough for the crust.  It is sort of like a shortbread cookie in texture, thus is a bit more crunchy than I am used to for a crust.  It was also quite sticky and kind of a pain, however at the same time it was very forgiving, for when it broke (which it did often) I could just press it back together and keep on moving!  I did not make a true lattice top for my crostata, as that was just too much work with such a tricky dough.  I just criss-crossed the strips and decided it looked wonderful as it was!


The filling is what really speaks for this crostata.  It is made of fresh figs, fresh raspberries, sugar, lemon zest, flour and butter.  Can you go wrong with that?  I think not.  It was delicious! I served the crostata with a dallop of almond whipped cream.  YUM. 

So here is to those days where you really can choose-your-own-adventure and have re-dos if you want, and to those other days when you have to go with the flow and follow where your choices might lead.  I hope the choices you make this week end with some successful baking and a tasty dessert!  You deserve it!


The recipe for the Raspberry-Fig Crostata can be found here, and the Sesame-Almond Dough can be found here


Sunday, October 27, 2013

Mummy Dip

I love getting into a theme for food, and what better one than Halloween?  I provided the snacks at our church this past Saturday so I decided to get a little into the spirit, without getting too scary or potentially offensive.  I made a Mummy bread bowl filled with yummy green dip.  Easy peasy, you can do this!

Shaped pizza dough

I found the idea at the Kraft website, though I didn't actually use the dip they suggested.  It was a spinach dip and sounded fine, but this yummy green dip was recently sampled at my grocery store and it hit my two criteria for dips:  (1) easy and (2) the kind you can't stop eating!    Sold!  Now since my green dip recipe is from my grocery store, it calls for their particular products.  If you do not live in Texas and thus cannot get to an HEB, the "Relish that Corn" is a relish made of corn, pepper, vinegar and spices, and "That Green Sauce" is a creamy salsa containing jalapenos, poblano peppers, green tomatoes and sour cream.  If you can come up with some similar products in your area, you are good to go!


Mummy Dip
adapted from Kraft and HEB grocery stores

Ingredients:
1 package frozen pizza dough, thawed (mine was 14 oz.)
1 egg, beaten
2 sticks mozzarella string cheese
1 12 ounce container whipped cream cheese
1 jar "Relish that Corn", juices drained
1 jar "That Green Sauce"
1 cup shredded cheddar cheese

Instructions:
Pat the dough into an oval of approximately 6-in by 12-in.  Indent the dough about 3 inches down from one end to form the mummy's head.  Let rise in a warm place for 20 minutes or until doubled in volume.

Heat oven to 375F.  Brush dough with the beaten egg and bake for 18-20 minutes or until the bread is golden brown and sounds hollow when tapped.  Pull apart the string cheese to make thin strips and arrange the strips on the mummy's head an body for the wrappings.  Put back into the oven for 1-2 minutes, just until the cheese is melted.  Allow to cool.

Make the dip:  Combine the cream cheese, corn relish, green sauce and cheddar cheese in a medium bowl.

Use a sharp knife to remove an oval from the top of the mummy's body/stomach.  Scoop out the bread from the center, leaving a thin shell of crust on the bottom and sides.  Reserve the bread top but discard the bread crumbs.  Fill the bread with dip just before serving and cover with the top of the bread/belly.  Serve with crackers/chips/veggies.

Note:  For mummy's eyes, I cut small circles out of a red bell pepper, and then also cut small circles out of the mummy's face and set the pepper into the eye sockets.  You could also use an olive slice, in which case you could simply press the olive to the mummy's face while the bread is still warm from the oven, no need to cut out holes.  Or use whatever you desire to make an eye!
Printable Recipe

You could put any sort of dip inside your mummy.  If you wanted to get a bit more creepy, you could use some sort of red pepper hummus or some other red colored dip so that the guts are more "festive" looking.  Just an idea...

If you do live in Texas, I suggest trying this dip.  Super easy and I can't stop eating it!

Happy Halloween!

Friday, October 25, 2013

Happy Birthday, Dorie!

Yesterday was Dorie Greenspan's birthday.  Happy Birthday to one of my most favorite cookbook authors of all time!  Seriously, if you do not have one of her cookbooks, I highly recommend buying one.  I personally LOVE Baking from My Home to Yours.  Every recipe in there is great.  I did not know about the Tuesdays with Dorie group when they baked through this cookbook, which I MAJORLY regret.  Once we finish Baking with Julia, I may have to just bake through Baking from My Home to Yours on my own, unless there are others out there who want to join me??  If you are someone thinking of trying a bit more baking, this is the cookbook I recommend.  Dorie is awesome.  AND, she had a birthday yesterday.  Yes, it was yesterday and not today.  I know I am a day late.  However that seems to be how I roll lately with birthdays...  I have an IDEA on time, but the execution and completion may not happen in the most timely manner.  That way you can celebrate your birthday even longer, right? 

Above pictured are Dorie's World Peace Cookies.  This is essentially a chocolate shortbread cookie, with more chocolate inside plus some sea salt to give you a nice salty kick.  Yum.  The clever girl called them "brownie cookies" and she is on to something there.  They have the flavors of a good chocolate brownie plus that awesome salt kick, but have the shape and texture of a shortbread cookie.  Best of both worlds, I would say.  According to Dorie, the cookie got it's name from a friend who said that eating these cookies daily would ensure world peace and happiness.

World Peace Cookies
adapted from Dorie Greenspan
makes about 36 cookies

Ingredients:
1 1/4 cups all-purpose flour
1/3 cup unsweetened cocoa powder
1/2 teaspoon baking soda
1 stick plus 3 TB unsalted butter (11 TB total), at room temperature
2/3 cup packed light brown sugar
1/4 cup sugar
1/2 teaspoon fleur de sel or 1/4 teaspoon fine sea salt
1 teaspoon pure vanilla extract
5 oz. bittersweet chocolate, chopped, OR a generous 3/4 cup mini-chocolate chips

Instructions:
Sift the flour, cocoa powder and baking soda together and set aside.

Beat the butter in a stand mixer fitted with the paddle attachment on medium speed until soft and creamy.  Add both sugars, the salt and vanilla extract and beat for 2 additional minutes.  Turn off the mixer and add the flour mixture all at once.  Drape a tea-towel over the mixer so you don't cover your entire kitchen with powder, and pulse the mixer on low speed 5-6 times.  Check the bowl - you want the flour to be starting to get mixed in - no longer on the surface of batter.  If your batter is at this point, remove the towel and continue to mix on low speed for about 30 more seconds, just so the flour has disappeared.  Do not overmix the dough - if it looks crumbly that is okay.  Add the chocolate pieces and gently mix only to incorporate the pieces.

Lay a piece of plastic wrap on your counter and turn the batter out onto the plastic.  Gently gather it together and divide in half.  Put one half back in the bowl for a moment.  Gently shape the other half into a log about 1 1/2 inches in diameter.  Wrap with the plastic wrap and repeat with the second half of the dough.  Refrigerate the logs for at least 3 hours.  The dough can be refrigerated for up to 3 days or frozen for up to 2 months.  If the dough is frozen, do not defrost before baking, just slice into cookies and bake for one additional minute.

Center a rack in the oven and preheat to 325F.  Line two baking sheets with parchment.  Using a sharp, thin knife, slice the logs into rounds 1/2 inch thick.  If the rounds crack while you slice them, just squeeze the bits back together.  Arrange the rounds on a prepared cookie sheet, leaving 1 inch between them.

Bake one sheet at a time for 12 minutes.  The cookies will not look done and they will not be firm, but this is perfect.  Stick the entire cookie sheet on a cooling rack and allow the cookies to rest until they are just warm, then serve them or let them come to room temperature.
Printable Recipe

If there is even a chance that these cookies could bring world peace and happiness, someone in the DC area needs to bake up some batches and get them to Congress.  Maybe these will help them figure out how to make good (dare I say better?) decisions. 

Again, happy birthday to Dorie.  What an amazing, brilliant cook. 

Monday, October 21, 2013

Pumpkin Pecan Pancakes

Ahhh, fall-ish weather has been gracing us here in Houston, which always inspires me to make all sorts of fall-ish recipes.  Being that I love all things pumpkin, I thought pumpkin pancakes were in order!  By the way, did you know you can now get organic canned pumpkin at Costco?  Bring it on!

Anyway, I did some googling and found a delicious recipe at My Baking Addiction.  Perfect! Now, she calls for lowfat buttermilk, which is WAY easier to find than high-test buttermilk.  However in my pancake experience, the high test stuff is superior and gives you puffier yummier pancakes.  So I used the high-test stuff here, and subbed skim milk for the whole milk that she suggested.  Surely that evens things out, right? 

Pumpkin Pecan Pancakes
adapted from My Baking Addiction

Ingredients:

1 1/2 cups lowfat buttermilk (I used high test!)
1/2 cup whole mlk (I used skim)
1 1/3 cups pumpkin puree
1 lare egg
2 TB vegetable oil
1 1/2 teaspoons vanilla extract
2 cups all-purpose flour
1/2 cup packed light brown sugar
 2 teaspoons baking powder
 1 1/2 teaspoons baking soda
2 1/2 teaspoons pumpkin pie spice
1/2 teaspoon salt
1 cup finely chopped toasted pecans

Instructions:
Whisk the buttermilk, milk, pumpkin, egg, oil and vanilla together in a medium bowl.

In a large bowl, combine the flour, brown sugar, baking powder, baking sod, pumpkin pie spice and salt.  Stir dry ingredients into the pumpkin mixture until just combined.  Fold in the toasted pecans. 

Heat a griddle over medium heat.  Lightly butter the griddle and then wipe with a paper towel to remove any excess.  Pour or scoop the pancake batter onto the griddle, using approximately 1/3 cup for each pancake.  When the surface of the pancakes have some bubbles, carefully flip the pancakes and resume cooking on the other side until lightly browned.  Transfer cooked pancakes to a cooling rack place on a baking sheet in the oven to stay warm.  Continue with the remaining batter.   Top with additional pecans (if desired) and some good maple syrup.
Printable Recipe

What a perfect start to a fall morning!


Saturday, October 19, 2013

Sausage-Kale Strata

We recently had a garage sale.  Lord, help us.  Garage sales are really something else.  I had thought (back when I must have been totally crazy) that we would have a garage sale before we moved into our new house.  However the timing of that was plain ridiculous, since I had a newborn baby at that time.  I certainly wasn't going to be having a sale with a newborn while we are trying to get ready to move.  That was crazy talk.  So we actually made a large donation of stuff before we moved, knowing we would have even more stuff afterwards.

It so happens that our new next door neighbor was building the same time we were, and moved in around the same time as well.  They mentioned that they were going to have a garage sale and wondered if we had anything we'd like them to put in the sale, so I decided to bite the bullet and go for it.  And it worked out well.  I had two boxes marked "garage sale" that we ended up moving to the new house, and had done lots of purging when we moved in, so we had plenty to sell.  And it was a success, though I must admit I don't plan to ever have another one.  They are a lot of work!  This is a long long way to introduce Sausage-Kale Strata, I admit.  I knew that on the morning of the garage sale I would not have the time (or energy) to make my typical Saturday morning breakfast.  I like a good breakfast on Saturday mornings - no cold cereal for me!  Thus a breakfast strata is the thing!  And then I found this amazing strata from the Pioneer Woman and thought I really needed to try it. 

Lordy.  I may never make another strata.  This is one DELICIOUS strata.  In fact, my neighbor (with whom we shared in the garage sale madness) said "this should be illegal".  And she might be right.  It is THAT good.  If you don't care for one of the ingredients, you could just use something else, however you really do just have to try this thing.  I halved the recipe from the Pioneer Woman site, and afterwards wished I hadn't.  I mean, it is probably good - I didn't really NEED seconds, but with something that delicious, you just want some seconds anyway!  And I have no idea how this thing would re-heat - though it would be worth trying.  Throwing leftovers away would be a sin. 

Here is the recipe.  Save it somewhere RIGHT NOW, put the ingredients on your grocery list, and plan on making this baby.  You will thank me.  I promise.

Sausage-Kale Strata
adapted from the Pioneer Woman
serves 12 - can easily be halved

Ingredients:
12 whole eggs
2-1/2 cups half and half (I used milk)
salt and pepper, to taste
4 TB fresh oregano, minced (or parsley, basil, etc.)
1 loaf crusty French or Italian bread, cut into cubes
2 pounds breakfast sausage
1 bunch (large) regular kale, torn into pieces
olive oil, for frying
16 ounces (weight) white mushrooms, halved
2-1/2 cups grated Monterey jack cheese


Instructions:
Preheat oven to 425F.

Mix together the eggs, half and half (or milk), salt and pepper, and minced oregano.  Set aside.
Place mushrooms in a rimmed baking sheet, drizzle with olive oil, and roast in the oven for 15-20 minutes, until they are golden brown.  Set these aside.
Heat the olive oil in a frying pan over medium-high heat  Throw in the kale and cook for 2 minutes, until slightly wilted.  Remove from the heat and set aside. Put the the sausage in the frying pan and cut it into crumbles with a wooden spoon as it cooks.  When browned, remove the sausage from the skillet and place in a bowl or plate lined with some paper towels to get rid of any excess oil. 
Layer half of each of the bread, sausage, kale, mushrooms and cheese in a large buttered lasagna pan.  For half of the recipe, I used and 8x8-inch square glass dish.  Repeat the layers, ending with the cheese.  Slowly pour the egg mixture over the top.  Press the mixture down with your hands, and cover with plastic wrap.  Set the pan in the refrigerator overnight.  It helps if you have something to press down over the plastic wrap in the refrigerator, so all of the bread is evenly soaked.  I used a second 8x8-inch dish and placed some water bottles inside for weight.  
In the morning, preheat the oven to 350F.  Take the strata out of the refrigerator and let sit at room temperature for 20-30 minutes.  Remove the plastic wrap and cover the strata with aluminum foil.  Bake for 30-40 minutes, remove the foil and continue to bake until the top is golden and slightly crisp.
Serve, and get ready to reap the praises of your friends and family!

You tell me.  Should this strata be illegal?  Should you have a license to make such amazing yumminess?  Maybe so! 

Tuesday, October 15, 2013

TWD: Baking with Julia - Danish Braid

This week's recipe for Tuesday's with Dorie is Danish Braid.  I have been spending a lot of time learning about different braids lately.  I have watched all sorts of tutorials online on the French Braid, the Dutch Braid, a Rope Braid, a Waterfall Braid.... Braids, braids, braids!  Of course, those are braids for HAIR, not pastry, but braids nonetheless.  I am still on a quest for a great hairdo for when the clever girl is a flower girl in an upcoming wedding, thus I have been doing all sorts of research.  Have you ever noticed how you can watch a tutorial/video about something online and think, "oh, okay, that's not so hard" and then when you actually sit down to DO said thing it is an entirely different story?  Yeah.  That's what has been happening here.  I keep thinking, "wait, how did they do that again?" and then I have to find the tutorial again and try to memorize it all over again.  Ugh.  Thankfully, this pastry was much easier than the hairdos I have been attempting!

The big thing with this recipe is that it is actually several recipes.  Each individual recipe is quite simple, you just have to make them all first before you can do anything that resembles this Danish Braid.  You start with the Danish Pastry.  It is quite straightforward and wonderful in that you can make it several days in advance and then work with it whenever you get the time!  The recipe actually says to cut the butter into the flour using a food processor but I did it with my trusty pastry cutter instead.  The point is to keep the butter chunks pretty big so I figured a pastry cutter would be fine.  It allowed me to wash the food processor maybe one less time.

Then, decision time... what do you want in your pastry?  You need a creamy filling and a fruity filling.  There are several ideas provided, of which I chose the almond filling and apricot filling.  You could totally do whatever here and not use the recipes at all, however I love almond anything and almonds + apricots = goodness in my book so I went with those two recipes.  Plus it meant that I didn't have to think about anything more - I could just follow a recipe and move on.  Sometimes, the less thinking I have to do, the better...  Ever have days like that? 

Both of these recipes are made in the food processor, hence, I washed that thing a lot!  And both turned out quite tasty as well.  My only potential change would be sugar.  I found them both to be too sweet for me, though I tend to like things less sweet than others, I find.  In my humble opinion, in both fillings the sweetness overpowered the actual flavor of the filling.  You tasted SWEET before you tasted almond and apricot.  So I would reduce the sugar next time.

Now that everything is made, you can create the braid!  Roll out the dough and put the fruity filling in the middle third, all the way down the center.  Spread the creamy filling over the top of the fruity one, all the way down.  Now you can prep for the braid!  Like any braid, you need sections to braid together.  So you cut diagonal slits down the remaining two sides of dough and then start crossing one over the other.  Left, right, left, right, all the way down the dough.  Give it an egg wash and sprinkle it with pearl sugar (or big white sprinkles, in my case) and set it aside to rise a bit.


The recipe is enough for two braids, so while one rose, I did the second.  If I had been thinking (again, not something I seem to do much of these days....  Did I mention I made this pastry the morning after a dinner party in which we all enjoyed some delicious wine and I stayed up way too late?  Yeah.  That is my excuse, this time anyway...) yes, had I been thinking, I would have rolled out the dough on top of these squishy ice sheets that I have.  Boy, that was a terrible explanation.  Okay, you know how you can sometimes get a wine bag (here we go with wine again!) that has little squares in it that are filled with some sort of gel and you can throw that bad boy in the freezer so when you put the wine in the bag it will stay cool?  Well, you can buy those things in just a sheet, and they are great for putting under a metal edgeless cookie sheet and then rolling out dough on top.  It keeps the dough cooler.  Get it?  Some day I'll actually DO it and take a photo for you. 

Anyway, once they rose for about 30 minutes, into the oven they went.  The recipe stated they should be in for 15-20 minutes, but mine were done in about 12.  Any longer and they would have moved from "golden" to "browned" for sure!

Then you put a glaze over the top, which I wish I did not do.  The glaze is supposed to be coffee and powdered sugar, but I used cream and powdered sugar.  Regardless, (A) the braid does NOT need any more sweet, and (B) when you drizzle the glaze over the top, you lose the beauty of the braid.  So, next time, no glaze for me.  It is totally up to you but in my opinion, it is completely unnecessary and sort of ruins the overall look of the braid.  In fact, if you have the Baking with Julia book, the picture they use in the book is of an UN-glazed braid! Ah-ha.  Again, had I been really thinking at the time.... Drat.

However, after all of that, it was quite good.  It really was not hard to do and it would be fun to try different fillings - maybe a berry one, or a fig one, maybe cream cheese instead of almond.  It will be interesting to see what my fellow Doristas have done with their braids - what sorts of fun fillings they created!

You can find the recipe for the Danish Braid in Baking with Julia, page 205.  The pastry recipe is on pages 50-51, and the fillings are on pages 202-204.  Or, I found the recipes for the dough and the various fillings here.   Check out what other TWD bloggers have created by following the links here

Enjoy a fancy looking Danish for breakfast one day!  It is worth the work!

Friday, October 4, 2013

Cranberry Orange Quickbread

Let's just say I am sick of hot weather.  Yes, we still have hot weather here.  I read all sorts of blogs with posts about fall weather happening and I am just green with envy.  We are still running our air conditioner, are still hot and sweaty outside, and are still swatting at those d*** mosquitos outside.  Ugh.  So I am trying to bake some coldness into my world.  I know, it sounds crazy since baking means using an oven which means hot temperature but I am thinking less literally than that.  Coldness as in the ambiance of flavors, the overall feeling that different flavors give you.  Like a cranberry orange quickbread.  Cranberry/orange makes me think of winter.  Coldness, see?  Winter = cold (well, in most places anyway).  Thus came the cranberry orange bread to my kitchen.

The recipe is from Anne Burrell.  That crazy haired woman can cook.  And this recipe works.  The flavors are spot on.  And, important in my world, it is super fast to make.  Seriously, I decided to start the recipe one evening when I had literally 30 minutes before a guest was coming over.  I had this bread in the oven AND the dishes washed before she got to our house!  Yes!  The bread wasn't actually for the guest, it was for a function the next day, but we could have served it while she was there!  Do you see the word "quickbread" in the title of this recipe?  Take that to it's true meaning - QUICK BREAD.  You got it!

Cranberry Orange Quickbread
adapted from Anne Burrell, Food Network
makes 1 loaf

Ingredients:
2 cups all-purpose flour, plus extra to flour loaf pan
3/4 cups sugar
1/2 cup brown sugar
1/2 teaspoon salt
1/2 teaspoon baking soda
1 stick cold butter, cut into pea size pieces, plus extra for buttering loaf pan
1 orange, zested (I recommend a large naval orange)
3/4 cups fresh orange juice (approx. 2 naval oranges)
1 orange, peeled, sections removed and diced
1 egg
1 cup dried cranberries

Instructions:
Preheat the oven to 350F.  Butter and flour a 9x5-inch loaf pan.

In a food processor, combine the flour, sugars, salt, baking soda and butter.  Pulse until the mixture is like "finely grated cheese".  Add the orange zest, juice and egg.  Pulse some more until just combined.  Pour into a bowl and stir in the orange pieces and cranberries.

Pour the batter into the prepared loaf pan.  Bake for 1 hour 15 minutes.  Rotate the pan halfway through the cooking time for even baking.

Cool for about 20 minutes and then remove the loaf from the pan.  Cool completely before cutting.
Printable Recipe

I would like to try this recipe with fresh cranberries.  I'll have to increase the sugar a bit to compensate but I think the fresh ones would really pop in the bread.  Something to work on....

Seriously, if you need a quickbread recipe, give this one a shot.  Fast and delicious.  What is better than that?

Tuesday, October 1, 2013

TWD: Baking with Julia - X Cookies

Our Tuesdays with Dorie recipe this week is for "X Cookies".  These are essentially grown up fig newtons.  Since I am a fig fan, I thought these cookies sounded like a fun treat.  Not necessarily what I will pack for snack day for the clever girl's kindergarten class, but good for us grown up types.  However, I must admit that the clever girl thought they were pretty good.  I just think that some other kiddos wouldn't care for them, plus since one of the ingredients is RUM, I don't want to become "THAT MOM" in her class, so snack day will have to be something else!  Which leaves more of these cookies for me!

Why did Nick Malgieri (the recipe author) make X cookies?  Maybe he was playing with the dough one day and ended up with these cute little X's?  Could there be O cookies too, so they could be X's and O's?  Like kisses and hugs? 

They start with a sweet dough that is a great recipe on three counts:  (1) it is fast and (2) it is tasty but (3) it is foolproof, according to Nick Malgieri!  I must say, a foolproof dough recipe is about too good to be true!  The dough is made in a food processor, and is a combination of flour, sugar, baking powder, salt, butter and eggs.  Once it is good and balled up around the processor blade, you are done!  One thought, though - I think it would be nice to add a little almond extract to the dough.  It would complement the filling nicely I think....

Dump that dough out onto a floured mat, knead it a little and then shape it into a log.  Done.

Now that the dough is done, let's do the filling:    Use that trusty food processor again for this step.  Put in all of the filling ingredients and pulse until it is all finely chopped.  The filling consists of figs, toasted almonds, apricot preserves, raisins, candied orange peel, chocolate, rum, and cinnamon.  YUM.  However, if these ingredients don't float your boat, I am certain you could mix things up a bit here.  You just want something that is almost like a paste, that you can roll into a log shape.  Speaking of log, shape this mixture into a log and cut it into 12 pieces.

Time to make some X's!  Cut your big roll of dough into 12 pieces.  Take one of those pieces and roll it into a 12 inch log.  Flatten it so it is about 3x12-inches. 

Now take one of your filling pieces and roll that into a 12 inch snake and sit it on top of your flattened dough:
Not very appealing looking, right?  Let's just not think about that, okay?

Now wrap the dough around the filling and roll it a bit longer so now it is 15 inches in length.  Cut into 3 inch long pieces - each of these forms an X.  

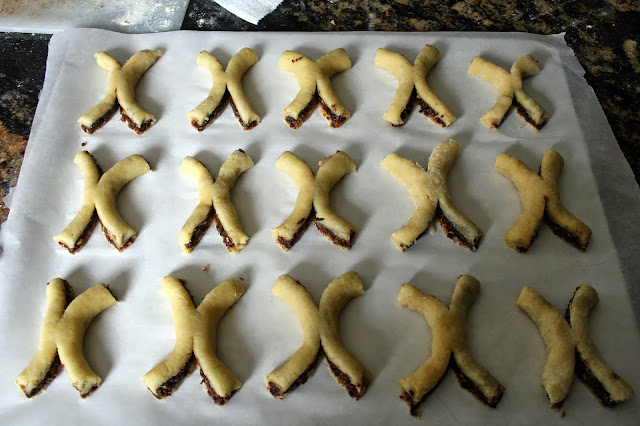
Now cut a small slit up each end of your piece of dough and shape into an X!  And there you have X cookies!  

Now brush with an egg wash and put them in the oven.  I actually forgot the egg wash on my first tray - the recipe actually never says to apply it, it just mentions the wash in the ingredients list, so by the time I was at this part of the recipe I had totally forgotten about that silly egg wash!  But I remembered when I took them out of the oven and managed to make it happen for the rest of the cookies.  The egg wash gives the cookies a nice sheen.  

We enjoyed these cookies.  The shape is something fun and different, the filling is tasty, and the recipe makes 5 dozen!  Hooray!  I think these would be a great addition to a Christmas platter.  Or should I say X-mas platter?  Teeheehee...

 Would you like one?

The recipe for X Cookies can be found on pages 318-319 of Baking with Julia, or you can find it here.  Do take a moment to see what other bakers in this group thought of the recipe - there are some great (and funny) cooks among us!  You can find our link list here!  Hey, do check that out - one of the bakers made O cookies and played tic-tac-toe!  Now THAT is clever!