Tuesday, October 2, 2012

TWD: Baking with Julia - Cranberry-Walnut Pumpkin Loaves

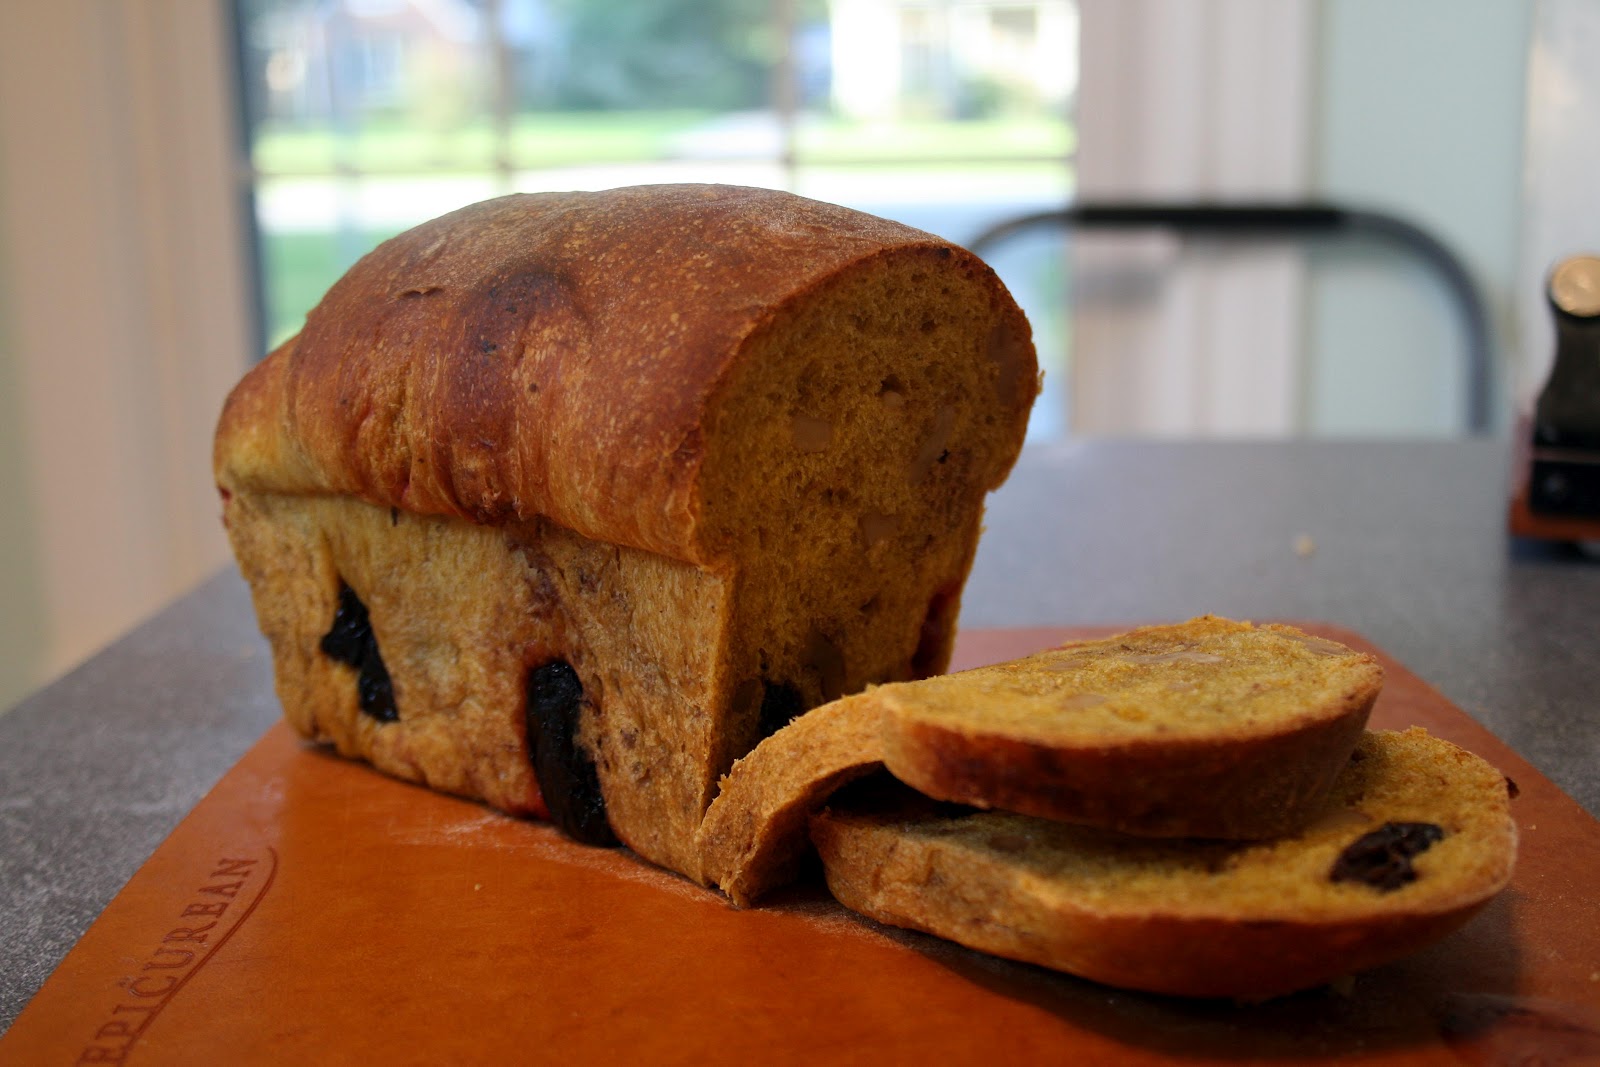
The recipe for our Tuesdays with Dorie, Baking with Julia group this week is Cranberry-Walnut Pumpkin Loaves.  You might see the name of this recipe and think it would be a quick bread, like banana bread, but this is actually a yeast bread!  And wowie is it good!  Rebecca, of This Bountiful Backyard, is the host for this recipe and I highly suggest you check out her blog, get the recipe, and make this bread as soon as possible!  Or, you can find it on pages 108-109 of Baking with Julia

Since my most recent Tuesdays with Dorie bread did not turn out so well, I was a bit nervous to make this recipe and made sure I followed the instructions exactly.  I needn't have worried.  For whatever reason, this bread worked out for me this time!  It must have been meant to be.  A Cranberry-Walnut Pumpkin Loaf truly screams AUTUMN to me, which happens to be my favorite season.  However I live in Houston, Texas, where we do not really have autumn.  At least not the autumn I know and love.  You know, the autumn where the weather turns cool, you wear long sleeves and maybe a sweater, your cheeks turn pink when you go outside, hot tea and chocolate become part of your regular beverages, the leaves turn their brilliant colors, and the air outside has that amazing crisp perfect smell.  Sigh.  Autumn in Houston means that the air might (or might not) get cooler, and cooler means that it is no longer in the 90s but likely in the 80s.  There is less humidity (always a welcome change) and the leaves, mostly still green, just give up hope and jump from their branches, tired of waiting for their colors to change.  I usually try to visit my parents in St. Louis during autumn so I can get a good dose of autumn-ness each year.  I digress.

As I was saying, maybe this recipe was meant to be because the day I decided to make it, we actually had a cold front come through!  Remember, I am in Houston, so a cold front means something different here.  It meant though that the temperature dropped a bit and it felt almost autumn-like!  Even the clever girl ran outside and asked if autumn was here.  She has been anxiously awaiting autumn as well and is in constant search of pretty leaves.  She craves wearing long sleeves and long pants.  She truly is my kid!  I digressed again.  Apologies!  This was the perfect autumn bread to make to celebrate the "autumn" coming in Houston!

The recipe is very well written and since it turned out so well I can't say I have any complaints!  Well, other than a warning that this is another recipe where you do something, WAIT, do something, WAIT, etc.  But it is totally worth it.  Get your timers ready and make this bread!

You start by mixing the yeast and some tepid water and letting the yeast get to a "creamy" state. 

While the yeast gets ready, cream some butter and sugar.  Feels like a quick bread, doesn't it?  But don't forget that yeast!  Also, whisk together some bread flour, cinnamon, nutmeg and salt in another bowl.

Add pureed pumpkin and an egg to the butter/sugar and then slowly add in the flour mixture.  I used organic canned pumpkin I find in my grocery.  For reasons I don't actually understand, the organic pumpkin is WAY less liquid-y or squishy than regular canned pumpkin.  It is almost solid in the can.  I like the flavor better and I think the consistency is better for most baked goods.

Once the dough has been kneaded in the bowl for 10-15 minutes, add the walnuts and raisins and mix only until incorporated.  Then carefully add fresh cranberries and mix extremely briefly.  The more you mix, the more you will pop the cranberries!  Not a problem, but the whole ones are amazing in the bread!  

Oh, and here is a little tip about fresh cranberries.  You might find them impossible to find in your grocery stores except around Thanksgiving and maybe Christmas (for here in the US), or whatever holidays your culture celebrates where cooks might use fresh cranberries.  When I see them, I always pick up a couple of bags.  One to use during the holidays and another to just keep on hand.  They keep perfectly well in the freezer.  Then you can use fresh cranberries throughout the year, in punch, in spritzers, in desserts, the options are endless.  Unfortunately the availability of cranberries is NOT endless unless you plan ahead!  So this year, grab an extra bag (I get the giant ones!) and throw it in your freezer.  It will come in handy!

This dough gets placed in a buttered bowl and covered tightly with plastic wrap for 2 hours, until the dough doubles in size.  I worried that my dough wasn't entirely doubled at the end of my 2 hours but it was really late and I was falling asleep, so I decided it would have to be good enough!  And it was!  Phew!  Refrigerate the dough overnight.


About 6 hours before you intend to bake the dough, take it out of the refrigerator and allow it to slowly warm up.  When it gets to 64F, divide the dough into 3 equal sections.  Pat each section into a 5-inch by 7-inch rectangle, roll short-wise, pinch the edge closed, and place into a buttered 5 3/4 x 3 1/4 x 2-inch loaf pan.  Cover with a tea-towel and allow to rise for another 1 1/2 to 2 hours. 

Bake at 350F for 35 minutes.  Allow to rest on a cooling rack for 5 minutes and then cool completely out of the pans.

Let's take another look at that top picture:
The raisins and walnuts and cranberries are randomly strewn throughout the inside of the bread, so each bite is like a little surprise.  You might get the sweet taste of a juicy raisin.  Or maybe the crunch of a walnut.  Or a tart pop of a cranberry!  The bread itself is really light with a tiny amount of sweetness.  It almost looks swirled with the cinnamon and nutmeg, though it isn't really.  And the pumpkin, besides adding a delicious flavor, gives the bread a beautiful golden hue.  It looks like autumn!  Autumn on a plate, I tell you!  Make this bread.  Yes, there are steps involved, but they are not hard and the end result is divine.  

To see what other TWD members think of this bread, visit the Tuesdays with Dorie blog and click on the LYL:  Cranberry-Walnut Pumpkin Loaves link.  There you will find a list of people who made this recipe, with links to their blogs!


Sunday, September 30, 2012

Daring Bakers: Empanada Gallega

September's Daring Bakers Challenge was an Empanada Gallega!  Patri of the blog, Asi Son Los Cosas, was our September 2012 Daring Bakers hostess and she decided to tempt us with one of her family's favorite recipes for Empanadas!  We were given two dough recipes to choose from and encouraged to fill our empanadas as creatively as we wished!

I am a bit late with this post (was supposed to post on September 27) but I wanted to make the empanada anyway!  I have made empanadas before but they tended to use some sort of pie crust and though tasty, I could never get past the idea that I was eating a TON of pie crust with each piece.  So the idea of making my own empanada dough was too tempting to pass up!

Making the dough was downright simple!  The recipe is very straightforward and it creates a dough that is both tasty AND easy to work!  (Gotta love that combination!)

Empanada Gallega with Ground Beef
3 1/2 cups (500 gm) all-purpose or bread flour (I used bread flour)
1 cup (240 ml) warm water
1/2 cup less 1 TB (100 ml) liquid fat  - oil, margarine, lard, etc.  (I used olive oil)
1 TB (15 gm) dry yeast or 1 oz (30 gm) fresh yeast
1 teaspoon (5 ml)(6 gm) salt
1 teaspoon (3 gm) sweet paprika

Put the flour into a bowl and make a well in the middle.  Add all of the ingredients.  If using fresh yeast, break it up as much as possible.  Mix with a wooden spoon until all of the ingredients have been incorporated.  Turn dough onto a floured board/counter and knead for 8 minutes.  Make a ball and place in an oiled bowl.  Allow to rise covered with a towel for about 1/2 hour before using. 

(make filling while dough is rising)

One risen, put the dough back onto a parchment covered, floured board/counter and divide it in half.  Cover one half with the towel to prevent drying.  Spread the other half of the dough using a rolling pin.  Depending on the shape of your oven pan or cookie sheet, you will make a rectangle or a round shape with your dough.  Roll the dough to a thickness that depends on your filling and the amount of dough you like in each bite.  For your first time, make it about 3 mm thin (about 1/10th of an inch) and then adjust from there in the next empanadas you make.

Filling
adapted from The Best Simple Recipes, America's Test Kitchen
1 pound lean ground beef
1 onion, chopped fine
2 TB tomato paste
4 garlic cloves, minced
1 teaspoon ground cumin
1 cup shredded Monterey Jack cheese
1/4 cup finely chopped fresh cilantro
salt and pepper

Cook beef and onion in a large nonstick skillet over medium-high heat until beef is no longer pink, about 5 minutes.  Add tomato paste, garlic and cumin and cook until fragrant.  Off heat, stir in cheese and cilantro.  Season with salt and pepper.  Allow filling to cool before putting it on the empanada dough.

Preheat your oven to 350F.

If you used the parchment paper mentioned above, place it with your rolled out dough on a baking sheet.  Place the cooled filling on top, leaving about an inch of dough around the outside.  (Note:  the reason for using cooled filling is so that the bottom layer of the empanada doesn't get soggy!) 

Roll out the other half of the dough on a second flour-covered parchment paper.  This "top" dough needs only to cover the filling, so it will be smaller BUT THE SAME THICKNESS as the bottom dough.  This is a good opportunity to trim off some of your dough to use for decorating the top of your empanada!  Carefully flip your top dough over the filling and peel off the parchment paper. 

Using your fingers, join the bottom and top dough, pinching the top and bottom together with your thumb and index finger and turning them half-way in.  This is how you end up with a rope-like border.  If you desire a video on this technique, check out http://youtu.be/CNpB7HkTdDk.  When the border is complete, make a 1 inch hole in the middle of the top layer of dough.  This helps hot air exit the empanada while baking.  Use the left over dough to decorate the empanada!

Prick the top layer of dough with a fork and cover with an egg wash.  Bake for 45 minutes.
Printable Recipe

As you can see in the photo above, my empanada opened up a little bit on the bottom edge, so my rope making skills were not spot-on.  Oh well!  The empanada itself was delicious!  The filling is very tasty, especially with the fresh cilantro.  The dough was great!  The flavor is really good, and that sweet paprika really makes it perfect.  I like the thickness I rolled, which was probably about the thickness of a quarter.  Though the dough recipe says it serves 6, and the filling recipe says it serves 4, I would say mine would serve 8! 

This seems like a long recipe but really it is quite simple.  The filling is made while the dough rises, so you could make this well in advance and just roll out the bottom layer when you are ready to bake!


Definitely a keeper for my family!  Many people in the Daring Bakers group made sweet empanadas, using fruit fillings, which is another great option!

Enjoy!

Thursday, September 27, 2012

A Bacon Bonanza

It was a bacon bonanza!  I am in a dinner group with some friends and we recently had one of our dinners.  In our group, whomever is hosting can decide the plan for the dinner, whether that means a general theme, choosing the actual recipes, etc.  This time, the hosts decided to do a "secret ingredient" dinner.  After we each chose what course we wanted to create, they emailed us all with the secret ingredient that each course must include.  BACON!  Mr. Clever Mom and I chose the appetizer course this time.  We usually choose dessert but decided to shake things up a bit and picked appetizers instead.  We created a bacon bonanza.

Above, starting from the top left, we made Pancetta-Wrapped Peaches with Basil and Peach Balsamic Vinegar, a Goat Cheese, Herb, Pecan and Bacon Pop, and a Bacon Cracker topped with Maple Bourbon Bacon Jam.  Mmmm.  I wish I could say "definitely try X recipe as it was the best" but really they were all so different and all really good.  The peaches were sweet and crispy and juicy, and the bacon pop paired with a crisp Granny Smith apple was really great, and my goodness that bacon jam was delicious.  Sweet and smoky and perfect atop a flaky bacon cracker.  I have to pat the two of us on the back a bit.  We made three great appetizers!  So here are the recipes for you to try!

Monday, September 24, 2012

My First Quilt Block!


I made my first quilt block for the clever girl's quilt!  I even lined up the print!  Yippee!  I am really pleased with it and am ready to tackle some more.  A whole lot more, for that matter.  I have lots of blocks to go!  Let's get this quilt moving....  I intended to get working on the quilt a while back but it just didn't happen.  However now that I have started, I can't wait to sew more! 

I am excited to get all of the squares done and figure out how to arrange them all.  I still have no idea as to how I will go about actually quilting this thing, but I am hoping for a quilting epiphany.  It could happen, right?

For more info about the quilt I am making, click on the link above and it will take you to my first description about this project.


Friday, September 21, 2012

The Best Fudge Brownies Ever!


I know.  The title of this post may seem to be a bit of a brag.  However, I would argue that it is not bragging, it is simply fact.  For one thing, I didn't actually name the brownies.  This recipe is from King Arthur Flour and used to be printed on the back of their bags of all-purpose flour.  (It isn't anymore, which is a true shame.  In fact, this exact recipe isn't even on their website!  There is something close but not the same and it has pretty mixed reviews.  Strange.)  For another, whenever I make these brownies, the compliments abound.  And then they keep abounding for days and even months after consumption!  Friends ask me to bring these brownies to events.  I once made these brownies for a function in my neighborhood and now I will run into people randomly who will say, "are you the brownie lady?".  It is crazy.  And it is true.  These brownies are simply THAT GOOD.  I will give you a caveat of warning however.  These brownies have ruined me for other brownies.  Often I can't even bring myself to try other brownies at events, and if I do I am constantly comparing them to these in my head, and simply put no brownie stands up to the comparison!  Your feelings towards brownies may forever change with this recipe.  Consider yourself warned.

I wish I was a better photographer so you could see the melted chocolate chips oozing out of the brownies.  I promise they are there.  

You might be asking, are they "fudgy or cakey", as that tends to be the big question with brownies.  I would hazard to say that these are a bit of both, though maybe they tend a bit more towards the fudgy side.  I have pondered this fudgy vs cakey question a lot with these brownies and I never really come to a solid decision.  I guess that just means I need to make another batch and try to figure it out again!

Tuesday, September 18, 2012

Tuesdays with Dorie: Baking with Julia - Whole Wheat Loaves

This week's recipe for Tuesday's with Dorie was Whole Wheat Loaves.  I had such high hopes for this recipe.  It seems like most people in our group had total success with this and plan to make it again and again.  I want to feel that way, too!  However I am not sure what went awry with my bread.  What you see above is actually the second batch I made.  In my first batch, I did not pay too close attention to the time when it was rising, so much more time passed than it should have.  I thought that could be the reason that the bread didn't rise in the oven.  But then I made it again and set the timer for the rising times and had the same dense result.  Phooey.  My second batch even seemed more elastic and appropriately kneaded than the first so I really thought I had fixed it.  I really don't know what happened and I hope someone might be able to point me in the right direction!  I want to master this bread!

Here are some of the specifics as to what I did to maybe help solve this puzzle:
  • I did not use active dry yeast, but used SAF Instant yeast instead.  I used 2 1/4 teaspoons of the instant yeast instead of the 1 TB active dry as the recipe requested.
  • I used liquid amber malt extract (many thanks to the suggestion to find it at a beer brewing store!)
  • I mixed it in my Kitchenaid Artisan mixer for the 10 minutes. 
  • It did seem smooth and elastic after kneading, though somewhat sticky. 
  • I let the bread proof in my oven on the proof setting.  I live in Houston and it is still very humid here so I thought being in a dry warm environment in the oven would be better than the humid kitchen with the air conditioner cycling.
  • I used a rolling pin to gently work the dough into the rectangle shape before putting it in the buttered pans.
  • The dough rose well during both rising times.  It was in the oven that it didn't really rise.

Many thanks to Michele of Veggie Num Nums and Teresa of The Family that Bakes Together for hosting this recipe!  You can find the recipe on their blogs or on pages 83-84 of Baking with Julia.   To see other bloggers successes with this recipe, visit the Tuesdays with Dorie blog and click on LYL: Whole Wheat Bread.

Please help!  I want to make this again and have it work.  I would LOVE to have a great whole wheat bread recipe to use.

Wednesday, September 12, 2012

Saffron and Cardamom Panna Cotta

Several posts ago, I alluded to a dinner party in which the theme was spices.  As the dessert course, I made pate a choux swans with vanilla bean and cardamom creme patissiere and a Saffron and Cardamom Panna Cotta.  To be honest, I wasn't sure if the swans would turn out, and I wanted something else to serve just in case.  Plus, when I saw this recipe it seemed to scream to me that it was the right thing to make for the dinner party.  Can you go wrong with two desserts?  I think not!

It just so happened that I had checked out Alice Medrich's cookbook Pure Dessert from the library just prior to planning this dinner party, in which she has an entire chapter on herbs and spices!  Honestly, it is an amazing book and I will have to purchase it for my shelf.

As it turns out, panna cotta is a perfect thing to make for a dinner party, because you can do it ahead of time and just pull it out of the refrigerator and top it with garnishes when it is time to serve!  Fantastic!