Tuesday, October 30, 2012

TWD: Baking with Julia - Irish Soda Bread


Since the month of October had 5 Tuesdays, the TWD powers-that-be decided that on the final Tuesday the bakers could catch up on a recipe they might have missed!  I thought this was wonderful, since I joined the TWD group a couple of months late and thus have several recipes to make to catch up!  For this month, I decided to "rewind" with Irish Soda Bread.

This recipe was originally made by the TWD bakers on March 20, 2012, and was hosted by Carla of Chocolate Moosey and Cathleen of My Culinary Mission.  You may find the recipe on these two blogs, or on page 214 of Baking with Julia.  And I highly recommend that you do go find that recipe.

This is an amazingly easy bread to make and it is totally adaptable to whatever flavors you might want to add.  The original recipe has only 4 ingredients:  flour, baking soda, salt and buttermilk.  I added a cup of raisins and several dashes of good cinnamon to my bread.  Essentially, you mix the ingredients together, knead it a bit, shape it into a loaf and bake it.  SIMPLE.  It comes out with a nice crust and a soft yet somewhat dense center.  The recipe claims that if you do not eat it the day it is made it might turn into a hard rock, but this was not the case for me.  I wrapped it tightly in plastic wrap, then sliced and served it the next day and it was as good as the day it was made! 

Saturday, October 27, 2012

Almond Bread

I made Almond Bread.  Seriously, it made me wish I could call my sister and get her to my house immediately to try some.  She lives in another state so unfortunately I couldn't do that, but man did I want to!  She loves anything almond and she needs to have this bread!  Luckily, she is a great cook so I will impress upon her to make this recipe.  She won't regret it.  Neither will you!  I found this recipe in my latest Cooking Light magazine.  I am honestly not sure what makes it light, though I am certain there are much higher-fat ways to create this so I suppose that is the key.  Anyway, "light" or not, if you enjoy almonds, you need to make this bread.

I brought it to church and it disappeared.  Poof! 

This recipe comes together lickety-split!

Thursday, October 25, 2012

Gnocchi with a Ham and Peas Cream Sauce

Do you have those days when you get to the afternoon and realize you have NO IDEA what you will do for dinner?  I have them all of the time, lately.  The one thing I wanted to make was too involved and time consuming at that point so I was at a loss.  Time to get creative....  Enter, Gnocchi with a Ham and Peas Cream Sauce.

Periodically I purchase packaged gnocchi (not the frozen kind but the kind in the pasta aisle) to have on hand.  Thank goodness I did this recently as it gave me a jumping off point for dinner planning!  I googled "gnocchi sauces" and found a lot of recipes for tomato sauces (no canned or fresh tomatoes in the house) and then I found a recipe for a Bacon and Peas Cream Sauce.  Eureka, I thought.  Then I went into the kitchen.  Strangely, I had no bacon in the freezer and very little peas.  Hmmm.  That doesn't look good.  But I had thinly sliced deli ham and a fresh zucchini, so that would have to work!

And work it did!  It was DELICIOUS.  Even the clever girl said "Momma, this is yummy.  Can you make it again??"  Yahoo!  I did it!  I'll try to tell you what I did, as well as what the original recipe suggested, so you can choose how you want to make this delicious, fast dinner too!

Gnocchi with a Ham and Peas Cream Sauce
adapted a lot from the reluctantgourmet.com
2 TB olive oil
2 TB unsalted butter
1 medium sweet yellow onion, halved and cut into thin half-rounds
4 cloves garlic, pressed
~9 thin slices of deli ham (I failed to weigh this, sorry), sliced into pieces about 1/2 inch by 1 inch
1/4 cup chicken stock
1/2 cup skim milk
1/2 cup frozen peas, thawed
1/2 cup chopped zucchini
1 pound gnocchi
1/4 cup grated Parmesan cheese
1/4 teaspoon nutmeg
salt and pepper to taste

First, put a large pot of water on the stove for boiling the gnocchi.  Get it to boiling so it is ready when you are!

Heat a large skillet to medium-high heat and add butter and olive oil.  Once the butter is melted, add the onions and saute for 2-3 minutes.  Add the garlic and zucchini and continue to saute for another minute.  Add the ham and cook for 2-3 minutes, until the ham is the consistency you like and the zucchini is is starting to soften.  Add the chicken stock and deglaze the pan if there are any stuck bits from the onions or garlic, then add the milk and peas.  When I made this, I accidentally used only 1/4 cup milk and thought to myself that it should be increased a bit, then realized that it actually called for 1/2 cup so that would be better to get a nicer sauce. 

Once you have added the milk to the skillet, add the gnocchi to the boiling water.  Gnocchi usually only takes 2-3 minutes to cook.  They are done when they float to the top of the water.  Drain the gnocchi and add them to the skillet along with the Parmesan cheese and nutmeg.  I have this awesome cool strainer spoon which I used to take the gnocchi from the pan as they finished and add them to the skillet.  If you don't have this cool gadget (you might want to get one!!) but you could also just use a regular spoon, being careful to drain the water each time, or just wait until all of the gnocchi is floating and dump it into a regular strainer. 

Gently stir the gnocchi, cheese and nutmeg into the sauce.  Add salt and pepper to taste.

Serve to your family and watch them clean their plates!!

NOTE:  The original recipe called for a red or yellow onion, 3 strips of bacon, 1/2 cup heavy cream, and 1 cup of frozen peas.  If you use bacon, you don't have to get the bacon to a crisp point when cooking, just cooked through. 
Printable Recipe

I couldn't be happier with this fast, last minute creation.  I will definitely have to start making sure I have gnocchi on hand all the time, for evenings like this.  The recipe is super adaptable with whatever you happen to have in your refrigerator.  Maybe someday I'll make my own gnocchi for this meal, but until that inspiration really gets me, I'm happy with the ready-made kind!


Tuesday, October 23, 2012

Spiced Pumpkin Pancakes


I have said it before, and I will say it again.  I love autumn.  I love everything about autumn, including the food.  One of my favorite autumn-y foods is pumpkin.  Around this time of year I often start making all sorts of pumpkin dishes.  So even though it is still in the 80's around here (seriously, I am about to go a bit nutty) I decided that autumn cooking should commence.  We'll start with Spiced Pumpkin Pancakes.  Mmmm.

I found this recipe over at epicurious.com at one point and it has continued to be a winner with my family.  I made some minor tweaks - reducing the amount of sugar, making my own "pumpkin pie spice", and using low-fat or nonfat milk instead of whole milk.  Instead of whatever your normal weekend breakfast might be, I suggest trying these pumpkin pancakes.  They are lovely.

First whisk all of the dry ingredients together, or get your sous chef to do it for you!  I have no idea why the clever girl is making this goofy face.  Maybe it is because she is 4.  That is my best guess...  Anyway, the original recipe calls for 3 TB of sugar here, and I use 2 TB instead.  I don't want my pancakes to actually taste sweet, just to have that nice pumpkin pie sort of taste.  For me, 2 TB is perfect. 

 Whisk the wet ingredients (except the egg whites) together in another bowl.

Mix the wet ingredients with the dry ones.  Beat the egg whites until stiff and gently fold them into the batter. 

Scoop the batter onto a hot buttered griddle and cook until bubbly, then flip.  As the anticipation mounts, warm your maple syrup!

Spiced Pumpkin Pancakes
adapted from Bon Appetit
1 1/4 cups unbleached all purpose flour
2 TB sugar (original recipe calls for 3TB)
2 teaspoons baking powder
1 1/4 teaspoons pumpkin pie spice (recipe follows)
3/4 teaspoon salt
1 1/3 cups milk (low-fat or nonfat milk)
3/4 cup canned pure pumpkin
4 large eggs, separated
1/4 cup (1/2 stick) unsalted butter, melted and cooled
1 teaspoon vanilla extract
 
Pumpkin Pie Spice
4 teaspoons cinnamon
2 teaspoons ground ginger
1 teaspoon ground cloves
1/2 teaspoon nutmeg
Mix all ingredients together in a small airtight container and use as recipes call for the pre-made spice!
 
Whisk first flour, sugar, baking powder pumpkin pie spice and salt in large bowl. Whisk milk, pumpkin, egg yolks, melted butter and vanilla in medium bowl and blend well.  Add pumpkin mixture to dry ingredients and whisk just until smooth.  Beat egg whites in another medium bowl until stiff but not dry. Gently fold whites into batter in 2 additions.  Brush a large nonstick skillet with butter and heat over medium heat. Working in batches, pour batter by 1/4 to 1/3 cupfuls onto skillet. Cook until bubbles form on surface of pancakes and bottoms are brown, about 1 1/2 minutes per side. Repeat with remaining batter, brushing skillet with oil between batches. Serve with syrup. 
Makes 15-19 pancakes, depending on the size.

These pancakes are so light and fluffy and delicious.  Why do I only make them in the autumn and not all year round?  I have no idea.  Maybe they'd be less special if they were a common occurrence in our house.  Regardless, it is time to celebrate autumn with some hot pumpkin pancakes.  Dig in!

Friday, October 19, 2012

Great Grains Muffins with Apricot

For this past weekend's hospitality time at church, I brought (among many other things, people in my church do like to nibble...which is a great thing, honestly) Great Grains Muffins.  The recipe is in Dorie Greenspan's amazing cookbook, Baking:  From My Home to Yours, which, if you enjoy baking, I suggest you strongly consider adding to your cookbook shelf.  It is wonderful.  Great Grains Muffins are very quick to make and I happily had all of the ingredients at home just waiting to be made into something delicious!  And since there are so many healthy grains and such, I felt like I was making something super healthy....  I am sure they are healthier than other muffins, so that counts, right?  Dorie suggests adding prunes or other dried fruits, so I chose apricots.  Yes, I had them on hand, and I figured they would be tasty.  They were!

Great Grains Muffins
adapted from Baking:  From My Home to Yours
makes 12 muffins (or approximately 24 mini-muffins)
1 cup all-purpose flour
1/3 cup whole wheat flour
1/3 cup yellow cornmeal
1/3 cup old-fashioned oats
1/4 cup sugar
2 teaspoons baking powder
1/4 teaspoon baking soda
1/4 teaspoon salt
1 cup buttermilk
1/3 cup pure maple syrup
2 large eggs
1 stick (8 tablespoons) unsalted butter, melted and cooled
3/4 cup quartered moist, plum prunes or other dried fruits (cut up as necessary) and/or chopped nuts (optional)

Center a rack in the oven and preheat to 400F.  Butter or spray a regular-sized muffin pan or fit with paper muffin cups.  You can also use a mini-muffin pan, as I did, but you must adjust the baking time accordingly.

In a large bowl, whisk together the flours, cornmeal, oats, sugar, baking powder, baking soda and salt.  In a large glass measuring cup, or another small/medium bowl, whisk together the buttermilk, maple syrup, eggs and melted butter.  Pour the liquid ingredients over the dry ingredients and gently but quickly stir with a rubber spatula or wooden spoon.  The batter should be a little lumpy.  Stir in the fruit and/or nuts if you are using them.  Divide the batter among the muffin cups.

Bake regular-sized muffins for 18-20 minutes, or until the tops are golden and a thin knife inserted into the center comes out clean.  I baked the mini-muffins for about 14 minutes.  Transfer the pan to a rack and cool for 5 minutes before carefully lifting each muffin out of its mold and onto the rack to cool.
Printable Recipe

I believe the muffins were a hit.  Well, there was only one left at the end.  That says something, doesn't it?


Tuesday, October 16, 2012

Tuesdays with Dorie: Baking with Julia - Bagels!


I love bagels.  However, I find it hard to find really good ones in the stores.  So when I saw that this week's Tuesday's with Dorie recipe was to make bagels, I was pretty excited.  It takes a while (though way less time than many other recipes in the book), so I kept procrastinating.  I am actually finishing the baking process as I write this, very late at night on Monday so it can post Tuesday!  Silly, I know.

Many thanks to the host of this week's recipe, Heather of Heather's Bytes.  If you choose to make your own bagels (and I think you should give it a go!) please go to her blog for the recipe, or find it in the Baking with Julia book on pages 87-90.  Yes, that is several pages of recipe, but it isn't because it is difficult, it is because there are several steps and there are great descriptions as to each step.  The dough only rises 2 times, and for relatively short periods of time.  The first rise is only an hour, and the second is 4 hours or you could do it overnight (which I would recommend though this is not what I did - procrastinating, remember?) 

The recipe itself really is straightforward.  The yeast is proofed, the ingredients are mixed, and bread dough is created.  I used my Kitchenaid Mixer for this though you could theoretically do it by hand.  I just had to hold on to my poor mixer so it wouldn't dance off the table and give it encouraging words when it sounded funny.  Anyway you come up with a smooth dough that you then stick in a buttered bowl, butter the top of the dough, cover with buttered plastic (butter, butter, butter... mmm) and then let rise for an hour.  After the hour, you deflate it and stick it in the refrigerator.  Again this is for at least 4 hours or you can do it overnight.  Another food blogger in the Tuesday's with Dorie group (whom I really like - another knitter AND baker!!) gave some advice as to these bagels and said she actually forms the bagels, puts them on a baking sheet and refrigerates them that way so in the morning she has less to do.  Brilliant!  She makes these bagels often and in fact the header photo on her blog is bagels!  Check it out at loaves and stitches

Anyway, if you do it as the book says and refrigerate a ball of dough, you then remove half of the dough from the bowl and leave the rest in the refrigerator.  Divide your half of dough into 5 pieces and then form them into bagel-like shapes with huge holes (more description in the recipe!!).  Drop these ring-toss looking circles into boiling water which has sugar and baking soda added, and once they rise to the top of the water let them boil for approximately 45 seconds per side.  Remove them onto a tea towel to dry a tad bit while you do the rest of the bagels in this batch.  Stick the boiled bagels on a baking sheet lined with parchment or a baking stone coated in cornmeal and glaze with a egg white/water mix.  Sprinkle with the topping of your choice.  Then they bake for 20-25 minutes at 500F (with ice cubes thrown into the oven for steam - very fun), then sit in an OFF oven for 5 minutes, then sit in the oven with the door open for 5 minutes, and then you can cool them on a rack.  Repeat with the rest of the dough.  I know, it sounds like a lot but it really isn't.  Unless of course it is after 11pm and you are totally exhausted.  This is what I get for procrastinating!  I hope I learn my lesson. 

Here is what my bagels looked like before going in the oven:

This is actually my second batch.  The first batch I did on my baking stone, and the second batch I prepped on a parchment-lined baking sheet so I could make a faster oven transition!  Clockwise from the top, I have a sesame/poppy seed, truffle sea salt, sesame seed, poppy seed, and another sesame seed.  I didn't want to get too crazy with toppings since the clever girl will be sharing them and I am not sure if she'd really go for an everything bagel (though I love those).  Maybe next time I'll get more creative with my toppings.
 
This is my first batch after coming out of the oven.  These baked for 25 minutes and I thought they probably could have come out sooner, so I did the second batch at 20 minutes.  From the top right, you see a poppy seed bagel, two sesame seed ones, another poppy seed one, and a kosher salt bagel.

I can't wait to eat them for breakfast!  Must continue this post in the morning before I pass out at my desk.....

Ok,, now it is Tuesday morning and I can try one of my bagels!  I went for a run first, so Mr. Clever Mom and the clever girl had breakfast before I returned.

They both enjoyed the bagels.  Two thumbs up from them.  Now it is my turn.  I sliced a sesame seed bagel, popped it into the toaster oven, and slathered it with some cream cheese (top photo).  The verdict:  Great!  I had one of the bagels from the second batch I made, which baked for 20 minutes instead of the recommended 25.  I think it could possibly bake even shorter as the outside was just a tad crispier than I prefer.  However, the flavor was good and the overall texture was right - with the crispy outside and chewy inside.

I will definitely try these again.  Maybe I'll make a batch and add some cheese....   Or add some cinnamon and raisins...  The options are endless.  I am thrilled that I have successfully made some bagels!!  How exciting!

To check out how some of the other bakers did with this recipe, go to the Tuesdays with Dorie link above and click on the "LYL:  Bagels" tab.  That will bring you to a listing of the blogs that tried this recipe!

Saturday, October 13, 2012

Apple Cinnamon Crumb Muffins

The time has come again where I and a friend are in charge of the "hospitality" time at my church.  During the month of October, we bring the goodies to eat between services.  For the first week, one of my treats was Apple Cinnamon Crumb Muffins!  Mmmm.  I made them mini-muffins so they would go further (I'm no dummy!!), and I ended up getting a lot more than I expected!  The recipe said it would make 12 regular size muffins and I got around 40 mini muffins!  I don't know how that happened but I'll take it!

Apple Cinnamon Crumb Muffins
adapted from twopeasandtheirpod.com
1 1/4 cups whole wheat flour
1 cup all purpose flour
3/4 cup light brown sugar
1 teaspoon baking soda
1/2 teaspoon salt
1 teaspoon cinnamon
1/4 teaspoon ground all-spice
1 cup buttermilk
1/4 cup canola oil
1 large egg
1 teaspoon vanilla extract
2 cups diced peeled apples (I used Granny Smith)

For the topping:
1/2 cup light brown sugar
1/3 cup all purpose flour
1 teaspoon cinnamon
3 TB melted butter

Preheat oven to 375F.  Line a muffin pan with paper liners, spray with cooking spray, or use a silicone muffin pan with nothing!

In a large bowl, whisk the flours, brown sugar, baking soda, salt, cinnamon and all-spice together.  In a small bowl, whisk the buttermilk, oil, egg and vanilla.  Pour the wet ingredients over the dry ingredients and mix with a wooden spoon or rubber spatula until just combined.  Do not over-mix!  Add in the apples and stir a tiny bit, just until they are combined.

Make the crumb topping:  combine all topping ingredients and mix with a spoon until crumbly!

Fill the prepared muffin pan with batter, filling each cup about 3/4 of the way full.  Sprinkle each muffin with crumb topping.  Bake for 20 minutes (check at 15 for mini-muffins), or until muffins are golden and a toothpick inserted in the center of a muffin comes out clean.  Let muffins cool to room temperature and serve.
Printable Recipe

The muffins were a hit!  It was unbelievable.  We had these muffins, some brownies, some cranberry-walnut pumpkin bread, fresh fruit, carrots, crackers, mixed nuts, some snack mixes, and someone happened to bring in a pumpkin bread and EVERYTHING disappeared.  We kept refilling bowls on the table with what we could, but eventually there was nothing left!  We even ran out of coffee, which never happens!  I wonder what next week will bring!  (I am a little scared....)


Thursday, October 11, 2012

Spinach and Cheese Stuffed Shells

Mmmm, there is nothing that says comfort like baked pasta.  My friend Callie made me these Spinach and Cheese Stuffed Shells shortly after the clever girl was born.  What a gift!  Not only was it delicious but it was so wonderful to have an amazing dinner brought to me at a time when I really needed the help!  My neighborhood has a similar plan for moms with new babies.  We sign up to bring them meals every other day for the first 3 weeks.  After receiving such help from my friends, I have to help the neighborhood ladies!  So, after my friend Susan recently had her third baby, I signed up on her schedule and made Callie's stuffed shells.

The recipe is something Callie created so feel free to tweak it any way you like!  And as you can see from the photo, it makes a TON.  It is hard to tell, but there are approximately 15 shells in both the 8-inch square pan and the aluminum round pan, and about 7 or 8 in the small loaf pan in the back.  The thing is, with a box of pasta shells, either you make the whole box and have a bunch of shells, or the box will sit half full in my pantry and take up space.  I'd rather fill my freezer with a ready-made dinner than have the half-full box in my pantry!

Spinach and Cheese Stuffed Shells
1 package Jumbo Shell Pasta
extra virgin olive oil
2 jars of your favorite pasta sauce.  If you don't have a favorite, here is my solution:  buy Classico Marinara or Tomato and Basil, dump it in a bowl, and add Worcestershire sauce, italian seasoning, fresh basil and oregano, fresh ground pepper, and whatever else you think tastes good.  Voila, yummy "jarred" sauce!
2 small containers part-skim ricotta cheese
small package of frozen spinach, thawed and squeezed
6 oz grated Parmesan cheese
2 eggs
2+ garlic cloves, pressed
mozzarella cheese (I used approximately 3 cups in this batch)

Preheat the oven to 350F.
Boil the pasta to al dente.  In a medium bowl, mix the spinach, ricotta, Parmesan, garlic, eggs, and a couple of handfuls of mozzarella.  Spray baking dishes with non-stick cooking spray. 
 Drain the pasta, reserving some of the pasta cooking water, and allow it to cool enough to handle.  This shouldn't take long.  I do not recommend running cool water over the pasta to speed this process.  When you do this, you remove some of the starch from the outside of the noodles, and the starch is what helps the sauce to adhere to the noodle.  Instead, just let the noodles cool off and if they end up sticking to each other a bit, pour some of the reserved pasta water over the noodles to help loosen them back up.
Fill the pasta shells with the cheese and spinach mixture and place them seam side down in the casserole dish(es).  Pour some marinara sauce over the noodles and top with another handful or so of mozzarella cheese.
Bake covered for about 20 minutes or until bubbly.  Uncover and bake a little more to brown the top.
Printable Recipe

I brought this to my friend with a loaf of cheesy garlic bread, a tossed salad, and some freshly baked brownies.   I hope she and her husband enjoyed an easy dinner night, and the entire family enjoyed the bounty.  We certainly did!


Friday, October 5, 2012

Sweet Cornbread

When I was growing up, this is what cornbread was, it was sweet.  Not sweet like you are eating cake, but much sweeter than the versions I later discovered.  Please do not think I am thinking poorly of the non-sweet cornbread version, it is simply different than what is "normal" for me.  I use a non-sweet version every Thanksgiving for my cornbread stuffing!  However when I make chili, or a big pot of soup, or simply have the craving for cornbread (which happens A LOT), this sweet cornbread recipe is what I crave!

Start by blending sugar and oil.  I am certain you could choose something different than oil here, like melted butter (yum) or try a lower-fat version and substitute some unsweetened applesauce or maybe even plain yogurt for some of the oil, but oil is what the recipe actually says.  Where did the recipe actually come from?  I have no idea.  You'd have to ask my mom.  Once the sugar and oil is "creamed" as well as you can do with oil, add in 2 eggs.

 Whisk (or sift) together the flour with baking powder and salt, then add the cornmeal and mix again.

Now you start blending the dry ingredients with the sugar/oil combination, alternatively with milk.  You might notice I am using a hand mixer here.  You could use your stand mixer as well.  I was just in the mood for my hand mixer this time.  I'd hazard to guess I use the stand mixer 90% of the time.

Add in some of the milk, and continue that process until all of the dry ingredients and the milk are mixed into the batter.  Yum.  Now you get to lick the beaters.  Heaven!

Pour it into a greased and floured 9-inch square pan.  Honestly, I am not sure I have ever actually used a 9-inch pan as most of my pans are actually 8-inches.  This is my first time using a metal cake pan for the cornbread.  Usually I use a square Pyrex dish, which is actually what I think I would recommend.  If you use a metal pan, you will need to adjust the baking time quite a bit (shorter).

Bake in a 400 degree oven for approximately 30 minutes.  I say approximately because I removed the above pan at 25 minutes and it was baked probably a tad longer than I like.  I like the middle to be cooked but still a bit soft.  Those are my favorite pieces.  In the glass dish, I start testing it at 25 minutes and go from there.

Cool the pan enough so you don't burn yourself and then cut some slices.  I generally cut between 12 and 16 slices, again depending on my mood!  You could eat this cornbread plain, slather on some butter, spread some honey on top, dip it in soup, whatever you choose.  The end result is simply delicious.

I hope you will try this cornbread recipe.  It makes me want to make it again just typing this blog post...  Mmmm.  So good...

Sweet Corn Bread
3/4 cup sugar
1/2 cup salad oil
2 eggs
1 1/2 cups flour  (I usually use half all-purpose, half whole wheat flour)
3 teaspoons baking powder
1/8 teaspoon salt
1 1/2 cups yellow corn meal
1 cup milk

Cream the oil and sugar.  Blend in the eggs.  Sift or whisk flour with baking powder and salt, then add the cornmeal.  Add the dry ingredients to the creamed mixture alternatively with milk.  Pour into a greased and floured 9-inch square baking dish.  Bake at 400F for 25-30 minutes.
Printable Recipe

ENJOY!

Tuesday, October 2, 2012

TWD: Baking with Julia - Cranberry-Walnut Pumpkin Loaves

The recipe for our Tuesdays with Dorie, Baking with Julia group this week is Cranberry-Walnut Pumpkin Loaves.  You might see the name of this recipe and think it would be a quick bread, like banana bread, but this is actually a yeast bread!  And wowie is it good!  Rebecca, of This Bountiful Backyard, is the host for this recipe and I highly suggest you check out her blog, get the recipe, and make this bread as soon as possible!  Or, you can find it on pages 108-109 of Baking with Julia

Since my most recent Tuesdays with Dorie bread did not turn out so well, I was a bit nervous to make this recipe and made sure I followed the instructions exactly.  I needn't have worried.  For whatever reason, this bread worked out for me this time!  It must have been meant to be.  A Cranberry-Walnut Pumpkin Loaf truly screams AUTUMN to me, which happens to be my favorite season.  However I live in Houston, Texas, where we do not really have autumn.  At least not the autumn I know and love.  You know, the autumn where the weather turns cool, you wear long sleeves and maybe a sweater, your cheeks turn pink when you go outside, hot tea and chocolate become part of your regular beverages, the leaves turn their brilliant colors, and the air outside has that amazing crisp perfect smell.  Sigh.  Autumn in Houston means that the air might (or might not) get cooler, and cooler means that it is no longer in the 90s but likely in the 80s.  There is less humidity (always a welcome change) and the leaves, mostly still green, just give up hope and jump from their branches, tired of waiting for their colors to change.  I usually try to visit my parents in St. Louis during autumn so I can get a good dose of autumn-ness each year.  I digress.

As I was saying, maybe this recipe was meant to be because the day I decided to make it, we actually had a cold front come through!  Remember, I am in Houston, so a cold front means something different here.  It meant though that the temperature dropped a bit and it felt almost autumn-like!  Even the clever girl ran outside and asked if autumn was here.  She has been anxiously awaiting autumn as well and is in constant search of pretty leaves.  She craves wearing long sleeves and long pants.  She truly is my kid!  I digressed again.  Apologies!  This was the perfect autumn bread to make to celebrate the "autumn" coming in Houston!

The recipe is very well written and since it turned out so well I can't say I have any complaints!  Well, other than a warning that this is another recipe where you do something, WAIT, do something, WAIT, etc.  But it is totally worth it.  Get your timers ready and make this bread!

You start by mixing the yeast and some tepid water and letting the yeast get to a "creamy" state. 

While the yeast gets ready, cream some butter and sugar.  Feels like a quick bread, doesn't it?  But don't forget that yeast!  Also, whisk together some bread flour, cinnamon, nutmeg and salt in another bowl.

Add pureed pumpkin and an egg to the butter/sugar and then slowly add in the flour mixture.  I used organic canned pumpkin I find in my grocery.  For reasons I don't actually understand, the organic pumpkin is WAY less liquid-y or squishy than regular canned pumpkin.  It is almost solid in the can.  I like the flavor better and I think the consistency is better for most baked goods.

Once the dough has been kneaded in the bowl for 10-15 minutes, add the walnuts and raisins and mix only until incorporated.  Then carefully add fresh cranberries and mix extremely briefly.  The more you mix, the more you will pop the cranberries!  Not a problem, but the whole ones are amazing in the bread!  

Oh, and here is a little tip about fresh cranberries.  You might find them impossible to find in your grocery stores except around Thanksgiving and maybe Christmas (for here in the US), or whatever holidays your culture celebrates where cooks might use fresh cranberries.  When I see them, I always pick up a couple of bags.  One to use during the holidays and another to just keep on hand.  They keep perfectly well in the freezer.  Then you can use fresh cranberries throughout the year, in punch, in spritzers, in desserts, the options are endless.  Unfortunately the availability of cranberries is NOT endless unless you plan ahead!  So this year, grab an extra bag (I get the giant ones!) and throw it in your freezer.  It will come in handy!

This dough gets placed in a buttered bowl and covered tightly with plastic wrap for 2 hours, until the dough doubles in size.  I worried that my dough wasn't entirely doubled at the end of my 2 hours but it was really late and I was falling asleep, so I decided it would have to be good enough!  And it was!  Phew!  Refrigerate the dough overnight.


About 6 hours before you intend to bake the dough, take it out of the refrigerator and allow it to slowly warm up.  When it gets to 64F, divide the dough into 3 equal sections.  Pat each section into a 5-inch by 7-inch rectangle, roll short-wise, pinch the edge closed, and place into a buttered 5 3/4 x 3 1/4 x 2-inch loaf pan.  Cover with a tea-towel and allow to rise for another 1 1/2 to 2 hours. 

Bake at 350F for 35 minutes.  Allow to rest on a cooling rack for 5 minutes and then cool completely out of the pans.

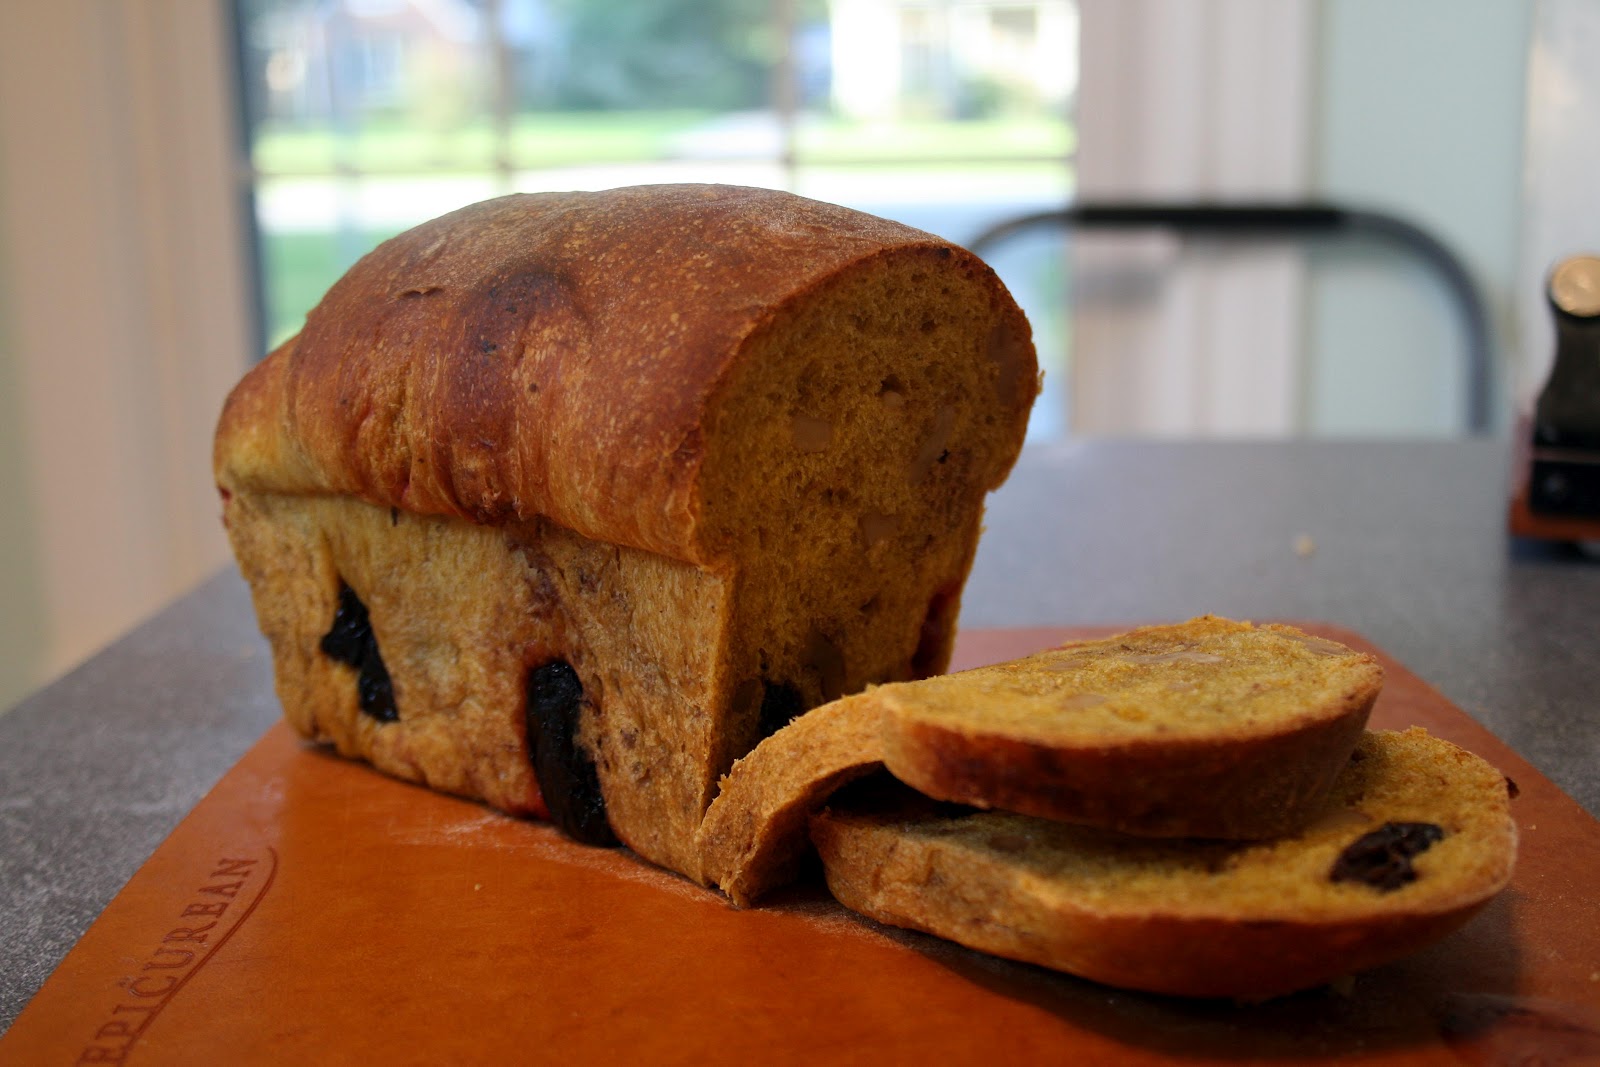
Let's take another look at that top picture:
The raisins and walnuts and cranberries are randomly strewn throughout the inside of the bread, so each bite is like a little surprise.  You might get the sweet taste of a juicy raisin.  Or maybe the crunch of a walnut.  Or a tart pop of a cranberry!  The bread itself is really light with a tiny amount of sweetness.  It almost looks swirled with the cinnamon and nutmeg, though it isn't really.  And the pumpkin, besides adding a delicious flavor, gives the bread a beautiful golden hue.  It looks like autumn!  Autumn on a plate, I tell you!  Make this bread.  Yes, there are steps involved, but they are not hard and the end result is divine.  

To see what other TWD members think of this bread, visit the Tuesdays with Dorie blog and click on the LYL:  Cranberry-Walnut Pumpkin Loaves link.  There you will find a list of people who made this recipe, with links to their blogs!