Saturday, August 31, 2013

A Heartwarming Gift

I have a guest crafter today.  See the cute blanket around the clever baby?  It was made for me by the amazing little girl in the green dress, whom I will call Miss M.  Yes, she is 7 1/2 years old and loves to sew!  Words just don't even express how much this warms my heart.  Just thinking of it makes my heart want to jump right out of my chest! 

Miss M is the darling daughter of a very good friend of mine.  In fact, I first met Miss M when she was about 4 days old, when her father and amazing mother checked out of the hospital after Miss M entered this world and drove from St. Louis to Houston to attend my wedding.  Honestly, those are the actions of a very special (and probably a bit crazy) friend!

I saw Miss M's mother the day before the top photo was taken, and she went home and told Miss M about how she had seen me and met the clever baby.  Miss M decided right then that she needed to make the clever baby a blanket, so that is what she did!  She picked out the fabric and sewed it that night and gave it to me the following day.  It just blows me away!  The blanket is made of two cozy flannels and is super soft. We love it!


I am so sad that Miss M lives so far away.  It would be fantastic to spend a day sewing with her!

A passion for sewing can start at any age.  Miss M is sewing blankets at age 7 1/2.  What will she be sewing in another 5 years?  Where will this creativity take her?  I look forward to watching it bloom!

Thank you, Miss M, for this special baby gift.  It is a treasure.

Thursday, August 22, 2013

A Birthday Cake Adventure!

We recently visited my in-laws in Colorado.  My sister-in-law's family was there as well, so we celebrated my niece's birthday together.  My mother-in-law had given her a few cake recipes so she could choose what birthday cake she wanted, and she picked the Raspberry Lemon Cake from King Arthur Flour.  When I arrived, my mother-in-law told me the birthday plan so of course I volunteered to make the cake.  Hooey, what a cake!  I mean to say this is ONE DELICIOUS CAKE.  And it became a bit of an adventure, as I will explain in a few moments!

The best thing about this cake though, is that it introduced me to my new favorite baking product - Fiori di Sicilia.  Have you heard of it?  I had never heard of it before my mother-in-law gave me some for Christmas.  And I thought, "ohh, this seems nice - a new extract to try".  Oh, boy.  NOw that I have tried it, words do not even express the amazing-ness of this extract.  It is simply divine.  It is a blend of vanilla and citrus extracts.  Go back to your childhood and think "Dream-sickle".  Now multiply that flavor in your head by making it more pure (as in no artificial taste) and more scrumptious.  Seriously, this stuff is the nectar of the gods!  Give it a try.  You can get it from King Arthur Flour, and I found a DIY recipe to make it yourself by combining 1 teaspoon pure vanilla extract with 1/2 teaspoon pure lemon extract and 1/2 teaspoon pure orange extract.  I haven't tried this but I might!!  This Fiori di Sicilia is heavenly!

Back to the cake.  There are several components - the cake, the lemon filling, the frosting and the raspberry filling.  Yes, many steps, but SO worth it.


The directions are very specific as to how many seconds you beat after each step.  I personally appreciate this, as I tend to get distracted these days and it is nice to have the reminder to make sure I don't over-beat things.  Anyway, the cake uses milk, lots of egg whites, vanilla extract, Fiori di Sicilia (AHHH), lemon zest, cake flour, sugar, baking powder, salt and butter.  Since I was making this cake in Colorado, I did all sorts of research as to how to convert things for altitude baking, which did seem to work.  If you are baking at altitude, I suggest you check the King Arthur Flour page about altitude baking

Cakes are done!  On to the lemon filling!

Here is where my adventure began!  The recipe calls for an ingredient called "Instant Clear Jel"  This product is sold by King Arthur Flour but is not something that my mother-in-law had on hand.  She had a package of guar gum and suggested that I use that instead but in a very small quantity.  OK, I thought.  I'll give this a try.  Well, it turns out that guar gum did not do what we needed it to do, at least not in the quantity that I used!  The lemon filling is supposed to be like a thick lemon curd, but mine turned out to be more like a lemon spread.  It was way too thin.  So if you make this recipe, either use the instant clear jel or figure out a different substitution that works better than my guar gum substitution!

The lemon filling contains lemon zest, lemon juice, Instant Clear Jel (or guar gum in my case - NO NO NO!!) sugar, butter, and egg yolks.  Essentially, it is lemon curd.  You could probably buy some lemon curd at the grocery store to use here, but don't tell anyone I suggested that!!

The frosting was made with a method I have never used before.  And I have to say that frosting was seriously delicious, so I will definitely use the recipe again!  To make this frosting, you dissolve sugar in boiling water and then add meringue powder and whip it until soft peaks form.  Then beat in the butter and add vanilla extract, Fiori di Sicilia, lemon powder (I have no idea what this is but I used lemon zest instead) and salt.  This frosting was light and puffy and delicious.  I will absolutely make it again.

Finally, the raspberry filling.  This is the easy step.  Mix some raspberry jam with some of the frosting and voila!  Raspberry filling!


Then you layer the cake!  You slice the cake layers horizontally, so there are now 4 cakes.  On the first layer of cake, spread half of the raspberry filling and then push some fresh strawberries into the filling.

First layer
Press the second cake layer on top, and spread the lemon filling/curd on top.  Here is when I began to suspect trouble.  The filling spread all over the top and poured down the sides of the cake!  NO!  Put the third cake layer on the top of the lemon filling.  Spread the rest of raspberry filling on top, followed by more fresh raspberries.  Put the top layer on and then frost the entire cake with the frosting.  Since I had lemon filling all over the place by the time I put the top layer on, I placed the entire cake in the refrigerator before frosting, to hopefully firm things up.  Once it was well-chilled, I frosted the cake.


All was well until I started to slice the cake!  See how the piece on the right is a bit cattywampus?  As I sliced the cake, my family ran around trying to to hold it together!  First just one side slowly slid off, then the other side started to slide - a cakeslide!  It was actually really funny.  It did not turn out to be the most beautiful cake I have ever made, but it was certainly one of the most delicious cakes I have ever made! 

Raspberry Lemon Cake
adapted from King Arthur Flour
my high altitude conversions are in italics

Ingredients:
Cake  
1 cup whole milk, at room temperature
3/4 cup egg whites, at room temperature (5 or 6 large eggs) -I used 6
1 1/2 teaspoons vanilla extract
1/2 teaspoon Fiori di Sicilia
1 TB lemon zest
2 1/4 cups cake flour - plus 2 TB
1 3/4 cups granulated sugar - minus 1 1/2 TB
4 teaspoons baking powder - used 2 1/2 teaspoons
1 teaspoon salt
12 TB unsalted butter, softened

Frosting
3/4 cup granulated sugar
1/2 cup boiling water
1/4 cup meringue powder
4 cups powdered sugar
2 cups unsalted butter, softened
1 teaspoon vanilla extract
1/2 teaspoon lemon powder (I used lemon zest)
1/2 teaspoon Fiori di Sicilia
1/4 teaspoon salt

Lemon Filling
1 TB lemon zest
1/2 cup lemon juice
1 3/4 TB Instant Clear Jel
3/4 cup granulated sugar
6 TB unsalted butter
4 egg yolks

Raspberry Filling
2 TB raspberry jam
1 pint raspberries

Instructions:
Cake:
Preheat the oven to 350°F (365F for high altitude).  Butter two 8" round cake pans and line the bottom with parchment. Butter the parchment and dust pans with flour.  

Mix the milk, egg whites, flavors, and grated lemon rind in a small bowl, stirring with a fork. Set aside.  In the bowl of a stand mixer, mix the cake flour, granulated sugar, baking powder, and salt low speed.   Add the butter and continue beating at low speed until the mixture is crumbly.  Set aside 1/2 cup of the milk mixture.  Add the rest of the milk mixture to the mixer bowl and beat for 1 1/2 minutes.  Add the remaining 1/2 cup milk mixture and beat for 30 seconds. Stop the mixer and scrape down the sides of the bowl.  Beat 20 seconds longer.  Divide the batter evenly between the two prepared pans and bake until the cakes begin to pull from the sides of the pans and spring back when lightly touched in the center - 20 to 30 minutes (15-25 for high altitude). Remove them from the oven, wait 5 minutes, then invert cakes onto a rack to cool completely. 

Lemon Filling:
Place the lemon zest, lemon juice, ClearJel, granulated sugar and butter in a saucepan.  Bring the mixture to a boil over medium heat.  Boil for 1 minute, stirring constantly.  In a small-medium bowl, whisk the egg yolks until smooth. Whisk in a small amount of the hot lemon mixture (this tempers the eggs so you don't end up with scrambled eggs).  Pour the egg mixture back into the saucepan, and stir until thick, without letting it come to a boil.  Pour the filling into a bowl and press plastic wrap onto the surface to keep a skin from forming as it cools. Cool to room temperature and then refrigerate until cold. 

Frosting:
Dissolve the granulated sugar in the boiling water and allow to cool completely.  Using an electric mixer (hand, or stand), combine the cooled sugar syrup with the meringue powder and beat until soft peaks form.  Add the powdered sugar a bit at a time (to save your kitchen from a sugar storm), stirring until thoroughly combined.  Add the butter and beat until creamy. Stir in the extracts, lemon powder (or zest) and salt. 

Raspberry Filling: 
Mix the raspberry jam with 1 1/2 cups of the frosting and set aside.

Cake assembly:  
Cut the two cake layers in half horizontally, to make 4 layers.  If your cake layers got a little domed on top, carefully shave off the dome of one of the layers so it is nice and flat.  This will become your send layer (which gets lemon filling on top).  Place a small amount of frosting in the center of your cake plate.  This acts as glue to hold your cake in place.  Place the bottom half of one of the cake layers on the cake plate.  Spread 1/2 of the raspberry filling on top of the cake layer, and then place about 1/3 of the raspberries on top.  Press the raspberries into the filling.  

Place the second cake layer on top of the raspberries.  Spread the lemon filling on top.  

Add the third cake layer and gently press down.  Spread with the remaining raspberry filling.  Gently press half of the remaining raspberries into the filling.  

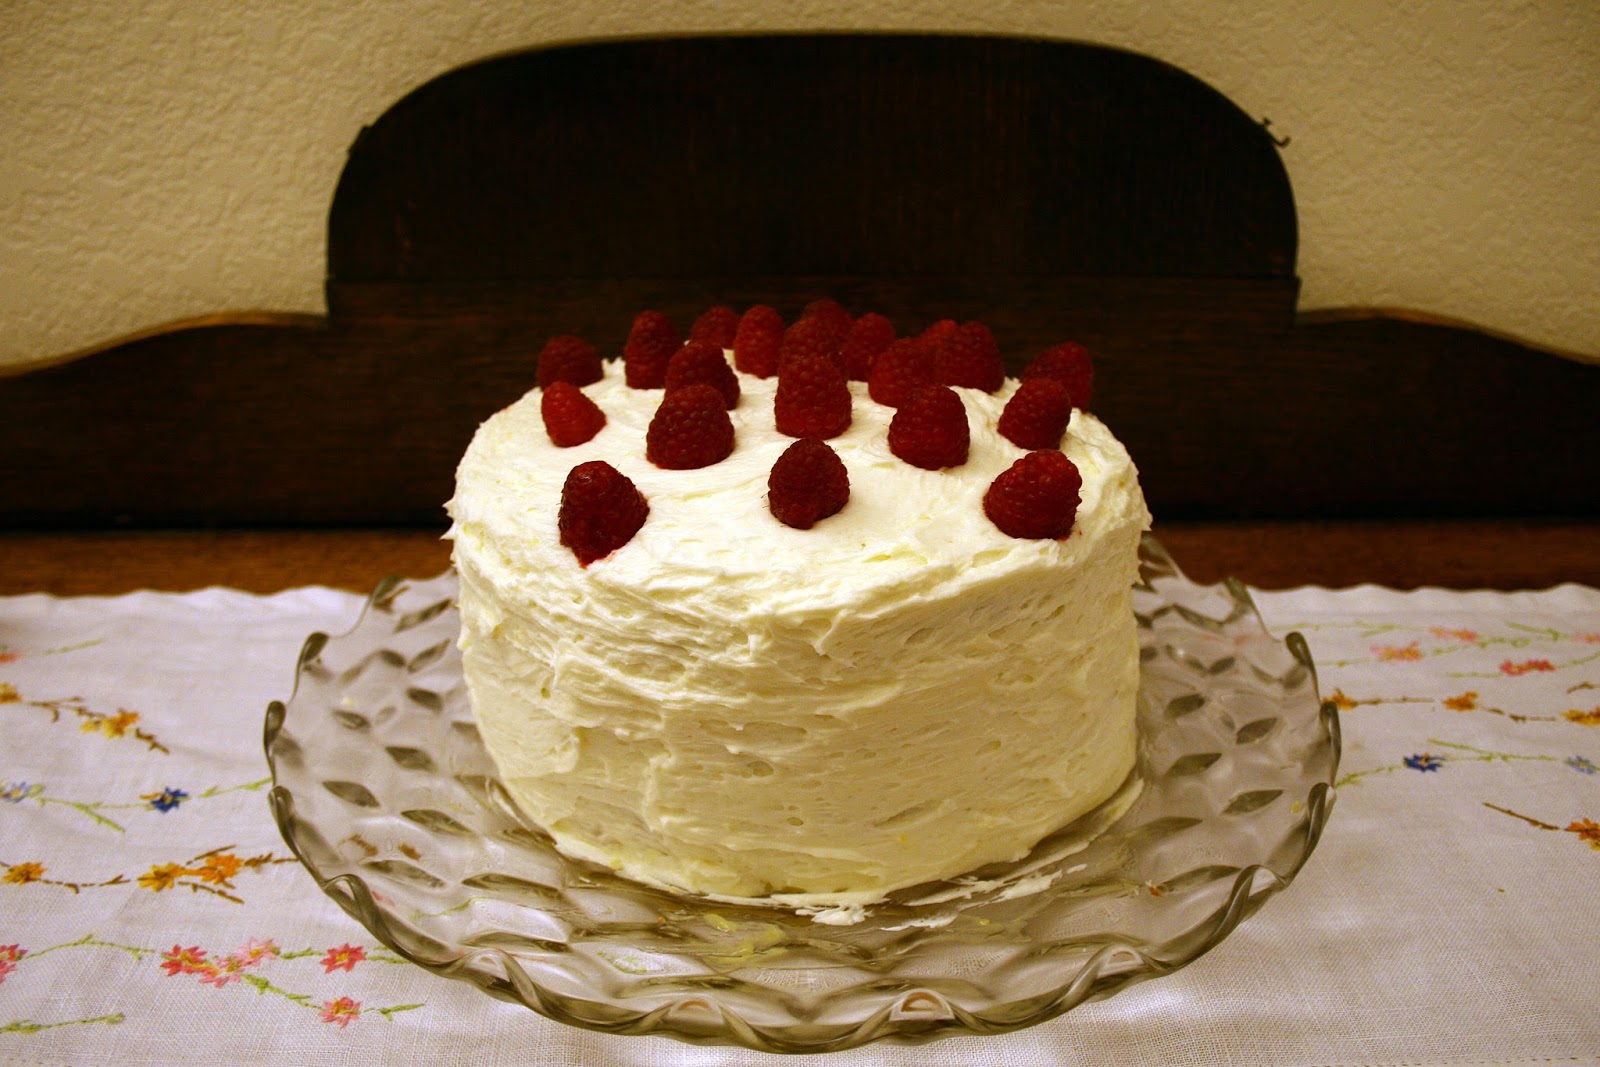
Top with the remaining cake layer.  Frost the entire cake with the frosting and decorate with remaining raspberries.

Serve to your friends and family and watch them swoon!
Printable Recipe


If you are a baker, I HIGHLY recommend my new most favorite extract - Fiori di Sicilia.  It is downright amazing!


Happy birthday to my incredible niece!  I am honored to have made a cake for your 17th birthday - and glad we shared the cake adventure together!


Tuesday, August 20, 2013

TWD: Baking with Julia - Johnnycake Cobbler

We had a choice as to what to make this week for our Tuesday's with Dorie challenge- Johnnycake Cobblers or Raspberry-Fig Crostata.  Since I knew I would be traveling right up to the post date for this recipe, I decided to make what appeared to be the simpler recipe, the Johnnycake Cobbler. 

You may wonder what make this cobbler a "johnnycake" cobbler.  The answer is cornmeal.  Basically, a johnnycake is a flatbread made with cornmeal, so a johnnycake cobbler is a cobbler made with cornmeal! 

This cobbler used nectarines and plums.  You could use any fruits here, in my opinion.  I went ahead and did what the recipe suggested since I found some fresh nectarines at the farmers market, and the plums in the grocery store actually looked good!  It was meant to be.  I happened to be visiting my parents when I made this recipe, and they have the greatest farmers market near their home!  My mom gets almost all of her fruit  and veggies there.  Not only is it a really great farmers market, but it is a lot of fun.  It seems like every time I go there is some sort of live band playing, and people are dancing, kids are playing with hula hoops, it is just a really fun time.  What a great component to their neighborhood!


Anyway, the first thing you do is slice a BUNCH of fruit (6 cups worth) and gently cook it in some melted butter and sugar.  The fruit softens and releases some yummy juices, which become the syrup for the filling.  Put the fruit into individual bowls or one big pan, like I did.  The recipe actually says that if you put it in a big pan, to use a 10-inch deep dish pie pan that fits 1 1/2 quarts.  I used an 8x8-inch baking dish (which is actually 2 quarts) and it fit perfectly. 

Then you create the cobbler part, which the recipe says to make in a food processor but I did with a hand pastry blender.  Plop the cobbler part on top of the fruit and bake. 

Take it out of the oven when the tops are golden, 12-14 minutes for individual cobblers, 14-16 minutes for one big one.  I actually baked mine a bit longer.  This photo was taken after 15 minutes of baking and when I scooped out the first serving, the biscuit part was a bit too doughy in the middle.  So if I made this again in one big pan (which is how I would do it for sure!) I would bake it for maybe 18 -20 minutes, and keep an eye on those last few minutes!

This recipe can be found on pages 389-390 of Baking with Julia.  And, since we don't have hosts in this group anymore, I'll post it for you here!

Johnnycake Cobblers
adapted from Baking with Julia

Ingredients:
Fruit:
3 TB unsalted butter
1/4 cup sugar, or more to taste
6 cups sliced nectarines and purple plums (9-12 pieces of fruit)
Biscuit:
1 1/2 cups all-purpose flour
1/2 cups stone ground cornmeal
3 TB sugar
1 TB baking powder
1/2 teaspoon baking soda
1 teaspoon kosher or fine sea salt
1 teaspoon minced ginger (optional)
1/2 stick (2 oz.) cold unsalted butter, cut into 12 pieces
1 1/4 to 1 1/2 cups heavy cream

Heavy cream or ice cream, for serving (optional)

Instructions:
For the fruit - melt the butter in a large skillet over medium heat.  Add the sugar and stir until the sugar dissolves.  Then add the fruit.  Stir the fruit to coat each piece and then cook, stirring periodically, until the fruit is soft and gives up some of its juice.  Spoon the fruit into 4-6 individual souffle molds, ramekins, or oven-proof bowls (each should hold 6-8 oz.) and set aside while you make the biscuit.  Or, spoon the fruit into a 10-inch deep dish pie pan (capacity 1 1/2 quarts) or any other similar-sized pan.

For the biscuit - move an oven rack to the center of the oven and preheat to 425F.  Put the flour, cornmeal, sugar, baking powder, baking soda, salt and ginger in the bowl of a food processor and pulse 5-6 times, just to mix the ingredients.  Or, put the ingredients in a bowl and stir with a whisk or fork.

Add the pieces of cold butter and toss them in the flour with your fingers, so that they are coated with flour.  Pulse the food processor 18-20 times, until there are no lumps and the mixture resembles coarse meal.  Or, use a hand pastry blender and go to work!

Transfer the mixture to a large bowl (unless you are already using that bowl with the hand pastry blender, then just keep the mixture in the bowl).  Make a well in the center of the ingredients and pour in  1 1/4 cups of heavy cream.  Stir with a fork to draw in the dry ingredients from the sides of the bowl and form a dough.  If the mixture is too dry, add more heavy cream.  You want a soft, moist dough that forms curds as you stir it.

Spoon the dough on top of the fruit, dividing it evenly among the individual bowls or placing it all on top of the large cobbler pan.  Place the individual cobblers on a foil or parchment lined jelly-roll pan and bake for 12-14 minutes, until the tops are nicely browned.  If using one big pan, just stick the pan in the oven, no additional pan is necessary, and bake for 14-16 minutes.  Transfer the cobbler/s to a rack and allow to cool for 5 to 10 minutes.  These are best served warm.  If you make them in advance, keep them at room temperature.

If you serve the cobblers with heavy cream, encourage guests to crack the tops and create a little opening for the cream to be poured in.  Or scoop ice cream right on top of the cobbler.
Printable Recipe

I enjoyed this cobbler.  I really like the addition of cornmeal to the biscuit.  It made the biscuit have a nice little crunch, while the biscuit itself was very light and tasty.  The recipe is so easy you could truly adapt it to any fruit that happens to be in season at the time.  Go for it!  Oh, and in case you are wondering, I do intend to make that Raspberry-Fig Crostata.  That will definitely appear in another blog post!


Monday, August 12, 2013

Fresh Peach Ice Cream!

Remember those fabulous peaches?  Here is my next peach adventure!  I found this recipe and it is scrumptious.  And simple.  And did I mention it is delicious?   

Fresh Peach Ice Cream
adapted from Make and Takes
5-6 fresh peaches, peeled and sliced
1 1/2 cups sugar
juice of 1 large lemon
1-2 teaspoons vanilla extract
1/8 teaspoon almond extract
2 cups heavy cream

Mix the peaches, sugar, lemon juice and extracts together in a large bowl.  Let this sit for about 15 minutes, stirring occasionally until the sugar is dissolved and the peaches release their juices.  Mash the peaches with a potato masher.  Measure out 2 cups of mashed peaches and puree in a blender or food processor.  Reserve the remaining peaches in a small bowl and refrigerate until very cold.  Add the heavy cream to the blended peaches and pour into a clean bowl.  Cover and refrigerate for several hours, or place in a freezer for about 20 minutes.  If you freeze, whisk the peaches well in case it freezes around the sides of the bowl. 

Pour the peaches/cream mixture into the ice cream maker and churn according to manufacturers directions.  Mix in the reserved peaches with the ice cream after the churning is finished, and place in an airtight container.  Allow to harden a few hours before serving.
Makes 1 1/2 quarts.
Printable Recipe

Mr. Clever Mom went on and on about this ice cream.  The peach flavor was so pronounced, and the texture was creamy and delicious.  Yum.  I recommend doubling this recipe.  You will be sad when your container is empty! 

Friday, August 9, 2013

Peach Cobbler

I recently found some mysterious peaches at the grocery store.  I say "mysterious" because though they were big and beautiful looking, they were as hard as rocks and had no smell whatsoever.  That makes me very suspicious.  So I bought just a couple to try them out.  I let them ripen a bit and they were DELICIOUS!  Mr. Clever Mom and the clever girl went on and on about the delicious peaches, and demanded that I purchase more!  Of course the delicious peaches made my baking urges turn on full force to PEACH COBBLER.  Ahhh.

Then I had to find the right recipe.  I don't have a "throw down" peach cobbler recipe so I did a little research and decided upon one from Cooks Illustrated.  Yum.  You let the peaches macerate with sugar for a while before cooking them on their own, so they are nice and juicy and sweet.  Then you make the biscuit-y topping, put it on the peaches and stick that baby back in the oven.  Now the biscuits get nice and browned and slightly softened on the bottoms from the peaches, but they don't get mushy.

Peach Cobbler
adapted from Cooks Illustrated

Ingredients:
Peaches:
2 1/2 lbs peaches
1/4 cup sugar
1 teaspoon cornstarch
1 TB lemon juice
pinch table salt

Biscuits:
1 cup flour
3 TB sugar
3/4 teaspoon baking powder
1/4 teaspoon baking soda
1/4 teaspoon salt
5 T cold unsalted butter, cut into 1/4-inch cubes
1/3 cup plain whole milk yogurt
1 teaspoon sugar

Instructions:
Set a rack in the lower middle of the oven, and preheat the oven to 425F.

Peel, halve and pit the peaches.  Scoop out and discard the dark flesh from around the pit.  Cut each half into 4 wedges.  Gently toss the peaches and sugar together in a large bowl and let stand for 30 minutes, tossing several times.  Drain the peaches in a colander set over a bowl to catch the juice.  Whisk 1/4 cup of the drained juice, cornstarch, lemon juice and salt together in a small bowl.  Toss the peach juice mixture with the peaches and transfer to an 8-inch square baking dish.  Bake until the peaches begin to bubble around the edge - approximately 10 minutes.

While the peaches are baking, pulse the flour, 3 TB sugar, baking powder, baking soda and salt in a food processor to combine.   Scatter the butter over the mixture and pulse until it resembles a coarse meal, about 10 1-second pulses.  Transfer to a medium bowl and add the yogurt, gently stirring with a rubber spatula until a cohesive dough is formed.  Do not over-mix.  Break the dough until 6 evenly sized mounds and set aside. 

After the peaches have baked about 10 minutes, remove from the oven and place the dough mounds on top, spacing them about 1/2 of an inch apart (no touching!). Sprinkle the dough mounds with the remaining 1 teaspoon sugar.  Bake until the biscuit topping is golden and the peaches are bubbling - approximately 16-18 minutes.  Cool on a wire rack until warm, about 20 minutes. 
Printable Recipe

This was delicious.  A total hit.  I think it tastes just like summer.  Plus it was really fast to put together, which is a necessity for me these days!  Do you have a favorite peach cobbler recipe?  Please share in your comments!

Mr. Clever Mom and the clever girl loved it.  And they wanted to know what else I might make with these delicious peaches...  Stay tuned for more! 


Tuesday, August 6, 2013

TWD: Baking with Julia - Eastern Mediterranean Pizzas

This week's TWD recipe is Eastern Mediterranean Pizza!  You start with a pita bread and then put yummy toppings with an eastern Mediterranean flair and there you go!  Eastern Mediterranean Pizza! 

I rather liked the pita dough.  It was simple enough to make and used both white and wheat flours, which I like.  The dough itself starts with a sponge that can rest for 30 minutes up to 8 hours.  I let mine rest for about 4 hours.  The flavor was quite good, so I do wonder what it would be like if I had the time to let it rest the entire 8 hours, and if I only let it rest for 30 min...  I hope some of the other bloggers share their thoughts on that one! 

The toppings to this "eastern Mediterranean" pizzas are shallots, garlic, lamb and tomatoes.  This is mixed with some cinnamon, allspice, salt and pepper for the Mediterranean flair.  I did not use lamb.  I just don't like it.  I don't like the idea of lamb, and I don't generally care for the taste.  Lamb is just not my thing!  Early on when I first started dating my husband, I went to his parent's house for dinner and was served lamb with mint jelly.  I know lots of people love this combination.  I truly don't get it.  Mint jelly?  Blech.  On MEAT?  Ack.  Anyway, as a newbie in the family unit (we were only dating!) I forced myself to eat what I could.  Unfortunately for me (but fortunately for my husband since I won't cook lamb) his parents love lamb and cook it often.  I, however decided that once we were married, I did not have to eat lamb any more.  And I haven't!  And if his parents have noticed, they must not care.  (They will notice now though, as my father-in-law follows my blog!!)  It's all just personal taste, right?

So, to end my long story about lamb, I did not use it in these pizzas, I used ground sirloin instead.  You just cook the shallots, garlic, meat and tomatoes together, add the spices, and plop some on each pita circle (8 total).  Sprinkle pine nuts on top (I love pine nuts) and into the oven they go for about 7-8 minutes.  Done!

We liked them, but mine would probably have been better if I had used (gasp) canned tomatoes.  I used fresh ones and they didn't have much flavor.  Pitiful to think canned ones would have been better, isn't it? 

Gotta run - off to visit  the in-laws....  I hope there isn't any lamb!!!

Thursday, August 1, 2013

Crispy Salmon and Arugula Salad with Carrot-Ginger Vinaigrette

I am cooking fish again!  I took a fish hiatus in my old house.  The combination of pregnancy and a not-great kitchen ventilation system did me in and I swore off of cooking all fish/seafood until we moved.  The old house had one of those vents that raised up from behind the stove, which in all honesty, is WAY better than no vent.  However it still does not get everything out and I just can't stand the smell of yesterday's dinner in my house the next day.  The new house has a ventilation hood system, which works way better!  (Did I mention yet that I love my new kitchen?  You'll probably just have to put up with me talking about it for a while, just to warn you.)  Anyway, I tried this new salmon recipe and it was DELICIOUS. 

The recipe is from Cooking Light magazine.  It is super easy (a huge plus in my book) and very tasty.  I highly recommend that you give it a try!  I will definitely make it again.  The clever girl has begged me to!

Crispy Salmon and Arugula Salad with Carrot-Ginger Vinaigrette
adapted from Cooking Light

Ingredients:
1/4 cup grated carrot
3 TB fresh orange juice
2 TB finely chopped onion or shallot, divided
2 TB extra-virgin olive oil, divided
4 teaspoons rice vinegar, divided
1 teaspoon honey
1 teaspoon minced peeled fresh ginger
3/4 teaspoon salt, divided
4 oz. baby arugula (about 6 cups loosely packed)
1 cup quartered cherry tomatoes
1 large red bell pepper, thinly sliced
1/2 teaspoon dark sesame oil
4 (6-ounce) fresh salmon fillets (I suggest wild Alaskan)
1/4 teaspoon freshly ground black pepper

Instructions:
Combine carrot, orange juice, 1 TB onion, 1 TB olive oil, 2 teaspoons rice vinegar, honey, ginger, and 1/4 teaspoon salt in a mini food processor or small blender.  Process one minute or until well combined.

Place arugula, tomatoes and bell pepper in a large bowl. Add the remaining onion, 1 1/2 teaspoons olive oil, rice vinegar and sesame oil and toss well.  Sprinkle with 1/4 teaspoon salt and toss again.

Heat a large nonstick skillet over medium-high heat.  Sprinkle fish with remaining 1/4 teaspoon salt and black pepper.  Add remaining 1 1/2 teaspoons olive oil to pan and swirl to coat.  Add fish to pan, skin side down.  Cook 6 minutes or until skin is browned and crisp.  Turn fish over and cook for an additional 2 minutes or until desired degree of doneness.  Arrange  1 1/2 cups of salad on each plate, top with 1 fillet and 2 TB vinaigrette.
Printable Recipe

As you can tell from the photo, I forgot the cherry tomatoes in my salad, but it was great anyway!  The viniagrette reminds me of some I have had in Asian restaurants.  The bitterness of the arugula with the sweetness of the salmon and the zip of the vinaigrette is really a fantastic combination.

I am not exaggerating when I say that the clever girl has begged me to make this again.  She gushed over the delicious meal (so nice to hear when sometimes dinnertime is SUCH a challenge) and has asked several times when we will have it again. I win.  A delicious dinner and a happy kid all at the same time!