Showing posts with label crafts. Show all posts

Sunday, February 8, 2015

Fingerprint Skyline - a school class art project!


The clever girl's school has a pancake breakfast each spring, which is the big fundraiser for the school.  Each classroom is responsible for making an art project to be part of a silent auction.  Somehow, the powers that be figured out that I am sort-of crafty, so I was asked to spearhead the art project for the clever girl's class.  I found an example of a fingerprint skyline on Pinterest and a video tutorial on Youtube, so I  thought I would try it out.

It takes a bit of prep work on the front end, but the kids had a blast doing their part.  I was in the classroom for maybe an hour and they were done.  It didn't interrupt their lessons very much and they really enjoyed creating art together.  In a time where so many schools cut art classes out of their curriculum because of crappy standardized testing (ooops, am I letting my true feelings show here?) and poor funding, I think it is important to introduce art whenever you can! 

If you want to make such a project with your child's class, here is what you will need:

Supplies:
  • A gallery wrapped canvas, 8x24-inches
  • fairly good sized jar of black acrylic paint 
  • small bottles of other random colors of acrylic paint for the dots
  • fine-point white paint pen
  • high gloss varnish (could also use a matte varnish if you like) 
  • paintbrush
  • masking tape
  • exacto knife or fine blade
  • sharp scissors
  • computer
I purchased the canvas, black acrylic paint (I used Liquitex brand), fine-point white paint pen, and the high-gloss varnish (also Liquitex brand) at Dick Blick online.  I already had many (many) bottles of colored acrylic paint but did purchase a few other colors and the paintbrush at Michael's craft store.   I already had the rest.

Directions:
First, you need to paint your canvas black.  Use the paint sparingly, as you don't want to get the canvas too wet or it might warp a bit.  I did 2 coats of black paint.  Paint all the way around the back and over where the canvas is stapled on the back.  That way you don't have to worry about lines/edges from where the paint stops and the blank canvas starts.  Let this dry.

While it is drying, go to your computer, pull up Google and click on "images".  Type in your city and the word "skyline", i.e. "Houston skyline".  You will get several skylines to choose from, and you can narrow your selection by clicking on "drawing" so you get more of the skyline black and white drawings instead of photographs.  Find one that you like and then use some sort of software to expand it to approximately 6 1/2x24-inches.  Whatever dimension the height is when you get to 24 inches in length should work, as long as it isn't over 8 inches!  I used Microsoft Publisher but there are probably many things that would work.  Print out your skyline that is now the right size and cut it out. If your cutting lines are thick, cut on the inside part, closer to the building.  This will help give you more space for when you are doing the masking tape part.

Gently tape the paper skyline to your black canvas.  I used rolled up scotch tape in random places, not too many but enough to stay down.  Trace around your paper skyline with the white paint marker.


Ta-da!  I added the word "Houston" on top, to clarify what the heck this was, in case it wasn't obvious from looking at the skyline.  If your city has a more well known skyline, you probably don't need to add the city name.  However, if you want to add a name, here is what to do:
  • Use Microsoft Publisher (you could use whatever) to write the city name in a font you like.  I used Gill Sans Ultra Bold.  
  • Print it out in the size you want on a piece of paper.  
  • Now cut off a piece of masking tape that is longer than your word, and stick it onto a piece of waxed paper.  Put the waxed paper/masking tape over the top of your city word.  You should be able to see through the masking tape.  
  • Trace the word onto the  masking tape.  
  • Place the waxed paper on a piece of cardboard and carefully cut it out with your blade.  I did keep the dots in the center of the "o's", but for some reason did not place them on the canvas for the photo.  
  • Very carefully remove the masking tape from the waxed paper and place it on the canvas where you like. Use your fingernail to really stick down the tape around the letters.  
 Now you are ready to tape up your canvas.  You want to put tape right up to the the edges of the white paint, covering the entire sky with tape.  Make sure the white lines are in the building areas that will be finger-painted, so that the lines will be covered up. 


I somehow forgot to take a photo of the buildings before we finger-painted it, sorry.  But you get the idea - the tape goes in the sky so the buildings are painted.  This taping part takes a bit of patience, especially if you have tiny slivers of gaps between buildings.  Just do your best.


Now bring the project up to school.  Here is what I brought with me:
  • paper towels (mess!)
  • small paper plates
  • paintbrush 
  • cup for water
Squirt a medium sized blob of paint on a paper plate, one plate for each color.  I used the paintbrush only when I had to mix up a color, which happened with my blue.  My blue color was too dark and wasn't so visible, so I mixed in some white to make it brighter.  I had 3-4 kids come paint at a time, each using a different color.  Ask them to just use the tip of their finger, not the entire finger pad.  And then we just kept going until it got pretty full.  At first I told them each to do 20 dots, then they came again and did 10 or so more, and then the kids that really were getting a kick out of painting continued with different colors until it was more full.  I touched it up a little when I got home, filling in a few areas that I found where the black showed through in the buildings.


When you are sure it is totally dry, gently pull off all of the tape.  If there are building lines that look a little shaggy, carefully paint that area with black paint and a tiny paintbrush to smooth things out.  Don't do too much, as you don't want it to show.  Plus this was made by kids and it does not have to be PERFECT.  It will be awesome regardless.  Last, use your white paint pen to draw in any significant antenna or random things that are on the tops of the buildings.  If you scroll back up to the top, you'll see that one of my buildings had a big cross-type antenna on the top, which I drew with the paint pen.  The pointy building to the left of the cross had some small antenna that I added as well. 

Make sure to write the year and the teacher's name on the bottom edge of the painting.   I did it on the side that faces the floor, but you can do it anywhere.

When it is completed, bring it by your child's classroom so they can all see the end result.  The clever girl and her classmates were astounded by their creation and were super excited.  It was great fun!

Our silent auction was yesterday and there were lots of bids on this beautiful masterpiece!  It was a hit and brought in a great price for the school.  Yeah!

Now I just have to start brainstorming for next year....  The clever girl goes to a public Montessori school so she will be in this class for 3 years.  I'm now the room parent for this class so I'll be spearheading art projects for the next 2 years!  If you have any ideas, please share!


Monday, September 8, 2014

Poinsettia Christmas Tree Skirt

Yes, I know, it is September and Christmas isn't for another couple of months.  I promise you, I am not one who starts decorating for the holidays this early!  (Though a week or so ago I did see someone in my neighborhood with a Christmas wreath on their window... could they have already decorated?  Or is it still up from next year??  Yikes.)  Anyway, I am posting this now because if you get the motivation to make this beautiful tree skirt for your house, you'll want a head start!

I got the idea last November when I realized that since our new house has really tall ceilings, I can have a really tall tree, thus my beautiful hand-knit tree skirt would look woefully inadequate.  I "obviously" needed to make something new, so I trolled Google to find something that caught my interest.  I landed upon this, which got my wheels-a-turnin'.  I decided to use my favorite new home decor fabric, painters drop cloth (from your closest hardware store).  It comes in pretty big pieces, and I did not want a seam in my skirt.  And I chose to do mostly off-white poinsettias, with a few dark red ones thrown in for interest.  I have to say, I LOVE how it turned out.  This is not a hard project, however depending on the size of your skirt, it can be a bit of a time-consuming one. 

Thursday, December 26, 2013

Handprint Christmas Ornaments


This may be late for this year, but something to keep in mind for another time.  Handprint ornaments!  Commemorate the year and size of your little ones forever with a handprint ornament for the tree!  They are simple to make!

Materials:
paper for hand tracing
pencil
scissors
felt
sharpie marker
embroidery floss/needle
ribbon

Trace your child's hand onto paper and cut it out.  For every ornament you intend to make, trace two hands onto felt with the magic marker and cut them out.  This makes the ornament thicker and have some structure for hanging on the tree.  If you choose, pick a side to be the front and do a simple backstitch embroidery into the center of the hand with your child's first initial and the year.  You could also do this with a sharpie marker.  Place two hands together and sandwich a loop of ribbon at the top, which is where the wrist of the hand would be.  Using embroidery floss and the needle, secure the ribbon between the two felt hands, then use a running stitch to sew around the hand and up the fingers.  Depending on the age of your child, they might be able to help with the stitching!  The clever girl did some of mine!

I attached these to the tops of Christmas presents for the grandparents and they were LOVED.   These were a surprise for my family, so I couldn't post them earlier!  Sorry! 
 

Friday, December 20, 2013

Plastic Bag Holder

Okay, this is one of those no-brainer projects that I am not sure why I didn't accomplish AGES ago.  How do you store your random plastic bags?  You know, the ones you get from the grocery stores, Target, from your newspapers, etc.  While I bring my own bags to the grocery store, the bags from places seem to multiply at our house.  Especially the newspaper bags.  We only get one newspaper per day, thus one bag per day.  But somehow we have about 3 zillion newspaper bags.  They used to be all shoved into another plastic bag (a Target bag to be precise) and stored underneath the bottom shelf in my pantry.  But the bags are not happy to be kept there.  They kept jumping out and having little bag babies all over the floor, thus the aforementioned 3 zillion bags. 

Enter, Martha Stewart.  She has this brilliant tutorial for making a bag holder out of a kitchen towel!  An ah-ha moment!  I did not photograph the steps in making this thing because Martha (or rather someone on her staff) already did so and the tutorial is quite simple.  Go HERE to see for yourself.

Here is what I did differently:  On the bottom where you put the elastic, Martha suggests cutting a slit in the seam allowance of the towel, threading the elastic through the seam allowance, and then tying the elastic in a knot.  Instead, I ripped out a tiny piece of the stitching for the seam allowance on each end, threaded the elastic through, and then zigzagged over the elastic at each end.  No knot tying.  As it is, there is a bunch of fabric right there from when I sewed the seam making the towel into a tube, so I didn't figure I needed to bulk things up more and tie a knot.   Either way works.

What are you waiting for?  You likely have all of the supplies you need to accomplish this super-helpful project sitting around at home, and it truly takes all of about 15 minutes to accomplish.  Martha used the following supplies:  towel, elastic, twill tape, safety pin.  I used the same, but if you don't have twill tape, you could always use ribbon or a long piece of some other fabric.  It is simply used as the loop for hanging this amazing contraption in a handy location! 

I actually made two of these:  One for newspaper bags (we use them when we walk the dogs) and one for other plastic bags. 

Get on it.  Show those plastic bags who is the boss!!  My entire pantry has breathed a sigh of relief.

Wednesday, December 11, 2013

Christmas Card Wreath

For years, I have struggled with how to display the Christmas cards we receive.  This year I happened upon the Craftiness is not Optional blog and found the perfect solution!  A clothespin wreath!  Brilliant.  Not only is it useful, it is also attractive!!  And simple to make.  Let's do it!

Thursday, October 31, 2013

From Ballerina to Cinderella - A Costume Transformation!


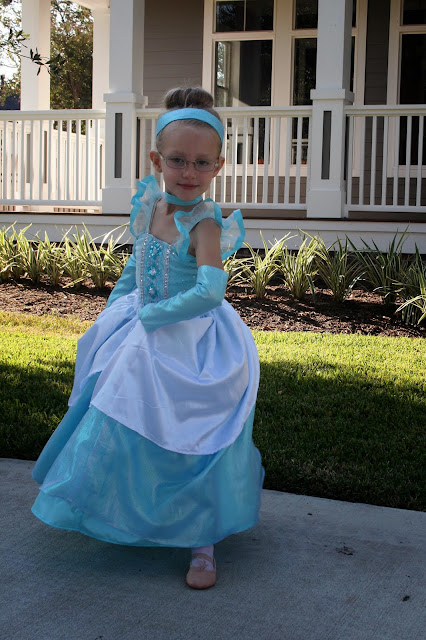
The clever girl was in a dance recital this summer, and had THREE, yes THREE different costumes.  I decided then and there that one of those costumes would have to be re-purposed for Halloween in some way!  So, when the clever girl said she wanted to be Cinderella for Halloween, I thought, "PERFECT"!  I knew that her blue ballerina costume would be just right.

So I lugged that tutu to the fabric store to pick out some matching fabric, and found a satin and some sort of shimmery organza-ish fabric for an overlay.  I also picked up some white satin with some silver sparkles for those weird hip things Cinderella has on her dresses.  What are those things, anyway?  What woman in their right mind wants some sort of accent to their hips??

I was so intent on getting this costume created that I neglected to take any photos along the way.  However, hopefully I can explain what I did in case anyone else out there wants to create a Cinderella costume someday! 

For the skirt, I knew I would put it on elastic and it would be worn OVER the tutu part of the ballerina costume.  The tutu would give it the ball-gown body.  And the skirt had to be very twirly, of course.  The clever girl is 25 inches from waist to foot.  I needed enough length to hem the bottom and to encase a 1 inch elastic for her waist.  I used about 1 1/2 yards of the blue fabrics for the skirt, and cut those fabrics into two pieces of 3/4 yard each.  Thus, there were two pieces of the blue satin that were 3/4 yard and two pieces of the blue sparkly fabric that were 3/4 yard.  I sewed the selvages together to make a gigantic tube of each, separately. 

For the bizarre hip things, I used 1 yard of the white fabric, and cut it in half to make two pieces, 1/2 yard each.  I rounded the corners of those rectangles so they looked like two big half moons.  I did an overlock (serge type stitch) over the curved edge, turned it under, and sewed it flat.  Hem done!

Then I stacked up my blue skirt fabrics:  blue satin on the bottom and blue sparkly on top.  I pinned the white pieces on top of the skirt, so that the middle of each moon met the seam of the blue pieces.  This way, the seams would be on the sides, not on the front and back.  Get it?  And I did an overlock stitch all the way around, catching all those crazy wisps of these fabrics.  I folded this edge down 1 1/4 inches and sewed near the edge, leaving an opening for the elastic.  String in the elastic, close the opening, done!  The blue skirts got a simple "sort-of" 1/4 inch rolled hem.  I say "sort-of" because I didn't measure one darned thing, I just folded the fabric over twice as I sewed it all the way around.  It is probably terribly uneven, but hey, it is a Halloween costume!  Skirt, done.


Now for the accessories:  In my online perusal of Cinderella costumes, I saw that Ashley of Make It & Love It made gloves, a choker, and a headband for her little Cinderella.  I would have probably forgotten these very crucial elements if not for her!  I didn't actually look at her blog when I made the accessories, but we pretty much did them the same way.

For the gloves, I measured the clever girl's arms in three places:  length from bottom of middle finger to upper arm, circumference of upper arm, circumference of wrist.  Then I just made a pattern that took those measurements into consideration - I knew I would cut the fabric on the fold and one end should have a point to attach to her middle finger.  Thus the length of the pattern was the same as the length of her arm from finger to upper arm, and the widths were about an inch (total) bigger than her wrist/upper arm measurements.  It looked something like this: 


I cut two each from both blue fabrics, placing the longest side (with the finger point) on the fold.  I overlocked the point end and the upper arm end, sewing a blue satin fabric to the blue sparkly fabric.  Then I folded the glove right sides together and overlocked the edges together.  I sewed a small loop of elastic at the point to go around the clever girl's finger.  Done.

The choker is a rectangle of both blue fabrics made into a tube that is a couple inches longer than the clever girl's neck circumference.  I sewed velcro to the ends to put it on/take it off.

Finally, the headband is another tube, though this one is angled down at the ends a little bit. 

Something like that.  I attached a piece of elastic to each end to keep it snug on the clever girl's head. 

And, her costume was done.

And, she LOVED it!

She spent lots of time looking in the mirror!  

 And then she turned right into a princess!

 But pretty much, she couldn't stop TWIRLING!

 and DANCING!

 and SPINNING!

 She loves her Halloween costume!

Oh, and in case your are wondering, of course the clever baby had to get in on the action as well.  You can't have a Cinderella without a Prince Charming, can you?  And who (in my world anyway) is more charming than the clever baby? 

 Yes, indeed, I did do that to my little guy. 

But seriously, is he handsome, or what?

His easy, peasy costume consists of some red knit pants and a grey/silver jacket that I found at a consignment shop.  I bought some gold braid, some gold fringe, and some gold rope and went to town.  I sewed the gold braid down each side of his pants.  Then I made little epaulettes with dark red felt and glued the fringe around three sides underneath and the gold braid around the four sides on top.  I sewed these to the shoulders of his little jacket, looping a piece of gold rope from one shoulder to the other, and another loop around his arm.  You can't see that too well on the photos, but it is under the arm closest to Cinderella. 

And here you go, Cinderella and Prince Charming.

So cute, I could eat them up!
Happy Halloween!


Thursday, April 4, 2013

Stamped Gauze/Muslin Snuggle Blankets


When the clever girl was born, I received a couple sets of "muslin baby blankets" that have since become treasured objects in our home.  We call them "snuggle blankets" and we always have at least 2 in her bed, one at school for naps, and one in the car.  Thus, there was no question that "Button" would need his own set of snuggle blankets.  No baby can be without!

Instead of purchasing them (they can be fairly expensive) I decided to make my own.  That's just how I roll, as you have probably figured out by now!  I read a tutorial that Dana of Made created, and got inspired.  I knew I wanted to make 8 blankets (that is the number the clever girl has), and I wanted to dye half of them.  The next consideration was decorating them.  Should I applique something onto them?  Hmmm...  Then I thought of using stamps and fabric paint.  Decision made.  That is what I would do.  I wouldn't say that stamping them is faster than applique - they both take some steps to complete, but I like how my stamped blankets turned out!

Monday, March 25, 2013

Fuzzy Baby Blanket Tutorial

I have been making these fuzzy baby blankets for a while, and finally decided to (a) get them onto the blog, and (b) make one for Button (my little one due very soon)!  They are super easy and fast to make, so get ready...

Supplies:
What you see here is enough for 2 baby blankets.

You need:
1 1/4 yards of a novelty cotton fabric (above it is the birdy fabric, in the top photo it is the one with blue and green animals)
1 1/4 yards of fuzzy "minky"-like fabric.  At Jo-Anns, this fabric is called "Soft and Comfy", "Ultra Cuddle" or "Soft and Fluffy" or something like that.  This is a good item to use a coupon for, as it can be a bit pricy!
1 package of Blanket Binding
matching thread

Wednesday, February 27, 2013

The Big Girl Bed! Part 3 - Constructing the Bed - a tutorial!

The bed!  I  must say constructing this bed was quite an undertaking, and totally worth it.  When I decided it was time for the clever girl to have a big girl bed, I immediately thought of constructing one instead of purchasing one.  This is mostly because I had the idea for a bed made with recycled doors a while ago and was just waiting until the right time to put that idea into action.  As I have probably alluded to in other posts, we are in the process of building a new house.  The property on which our new house is being built is around the corner from our current house, and actually had an existing house at the time we purchased the property.  That house was built in the late 1930's and though the house itself was not worth salvaging, there were items within the house that were!  Like, for instance, the doors!  When I saw those doors the idea of a bed made with re-purposed doors jumped into my head.

Though I don't consider myself to be a "woodworker", I do know a thing or two about working with wood.  I was that one weird girl that took wood shop for 2 years in junior high - the ONLY girl that had taken that class up to that point and until that particular teacher retired!  What's that about?  I also have a dad that is pretty handy and did some wood crafts from time to time.  Anyway, I liked it and have stayed somewhat handy with tools.  Truly, it is an important thing for a girl to know how to do, at least on a basic level, in my opinion.

Saturday, February 23, 2013

The Big Girl Bed! Part 2 - a Pleated Bedskirt tutorial

As you may know, I have been working on making the clever girl a big girl bed.  After finishing the quilt, I started on the bedskirt.  I unfortunately did not take many pictures of the process of making this bedskirt, for which I apologize.  I'll do my best to explain the process in this tutorial.

Here is a better look at just the bedskirt.  Please ignore the numerous wrinkles.  I actually starched and pressed the entire bedskirt once it was finished, but then it got buried in my sewing room under other projects so hence, wrinkles.  I am hoping they will eventually fall out as I didn't feel like pressing it again!

Wednesday, February 20, 2013

The Big Girl Bed! Part 1: The FINISHED Quilt!

It is time, past time honestly, for the clever girl to move into a "big girl" bed as opposed to the toddler bed she has been using.  For one, she is simply getting too tall for the toddler bed.  But just as important, there is another baby coming, and he will need the crib!  So I got all DIY about the entire project and decided to design and sew a quilt and bedskirt for her new bed, plus design and build the actual bed.  Yes indeed, sometimes I get a bit nutty with my "I could do that" attitude.

Let's start from the top:  the quilt.  If you have been reading my blog for a bit, you know about this quilt.  It started from a pattern for a twin-sized quilt, but since I wanted to build a full-size bed, I made an extra row of squares.  I also created a border around the entire quilt.  It didn't really need this border for sizing, but I thought it would look more finished this way, and I don't think you can really have a quilt that is too big.  I love that it actually covers the entire mattress.  Perfect.  You can read the initial posts about the quilt here, here, and here

While I originally wanted to get this entire project done by Christmas, I quickly realized that I was setting a goal that would cause me way too much stress and was pretty much un-attainable.  So, I decided to relax about it and just get the project done as soon as I could.  Much better! 


I created the back of the quilt and unfortunately failed to take any pictures!  For the quilt back, I used the fabric that I used for the very first square I made, which can again be seen here.  Then I brought the entire thing to my local quilting shop for the actual quilting.  If you happen to live in Houston and enjoy quilting or sewing or other fabric crafts, I highly recommend visiting Tea Time Quilting.  The shop is family owned, and you will likely visit with the mother or one of the two daughters that run the shop while you are there.  They are lovely and super helpful.  One of the daughters did the quilting.  She did a beautiful job.  I seriously got all teary-eyed when I picked it up.

Now it was time for the binding.  I had a little trepidation about doing a quilt binding, as I seem to often hear about people who make these beautiful quilts and then never bother to bind them because it is such a pain.  I could have had my quilt binding created and attached at Tea Time Quilting, but I chose to do it myself, just because that is the sort of person I am.  I found two GREAT tutorials online, which helped a lot.  You can find them at Red Pepper Quilts and Crazy Mom Quilts.  Whereas my mom always hand-sews the back of the binding to the quilt, I knew I would wash this quilt a zillion times so I followed the instructions for machine sewing the entire thing.  And honestly, it wasn't so bad!  I just followed the tutorial instructions step by step, went slowly, and it worked!  I did a major happy dance when I accomplished this feat.  Not only had I sewed on quilt binding, I had FINISHED the quilt!  Yippee!


The last thing I did was create a tag for the back, which was just more of the yellow fabric where I personalized the quilt for my clever girl.  I call this the "sunshine quilt".  I love this quilt.  I really think it is just a really happy quilt.  The clever girl was keeping an eye on the progress the entire time and loves it.  In fact, when I finally put it on her bed, she said, "Oh, Momma, you did a BEAUTIFUL job!"  That's my girl!

Check back for more about the Big Girl Bed project!

Friday, February 15, 2013

A "New" Infant Carseat Cover!


We chose the above sage colored carseat before the clever girl was born.  The actual seat has not expired yet, so we are able to use it for the clever baby when he arrives (sometime in early April)!  I am thrilled to not have to purchase another carseat, but thought the old cover needed some sprucing for the new baby.

A local decorator fabric store is going out of business, so I zipped over there and chose this fabric!  The fabric with yellow, grey, and black dots is called "Candy", and the black fabric with white giraffes is called "Stretch".  I thought they would make a fun carseat cover!  I purchased 2 yards of the "Candy" fabric and 1 1/2 yards of the "Stretch" fabric, and ended up with way more than I needed, but I am sure I can make use of the extra.  I also used some cheap white cotton fabric that I happened to have on hand for the inside lining of the canopy, 3 packages of canary yellow wide double fold bias tape, some small bits of batting, and Wonder Under double sided adhesive. 

I found a tutorial on Make It & Love It as to how she recovered her carseat and decided that was exactly what I would do!   Her actual carseat is a little different than mine, but the general idea is the same.  I took about a zillion pictures of the original carseat cover with all pieces intact, and then as I slowly took deep breaths and ripped apart the original cover, I took a zillion more pictures.  I have to admit that starting to rip the cover apart was probably the most difficult part of this entire project.  As doubt crept in, I bravely pushed it back and reminded myself that I knew I could DO THIS.

Sunday, December 2, 2012

Christmas Crafts with Kids: Ribbon Garland


Are you looking for a fun craft to do with your kiddo during Christmastime?   Make a ribbon garland for your Christmas tree!  It can take as long as you want it to, only limited to how long you want the garland to be or how much attention span your kiddo might have.  You could also work on it in spurts, so it doesn't get too tedious at one setting. Regardless, you will end up with a beautiful garland for your tree that you can use for years to come!

Friday, November 2, 2012

Halloween costumes through the years

I have made a Halloween costume for the clever girl every year except her very first.  As a kid, my mom (then my mom and I) made my costumes every year, so it just seemed natural that I would make costumes for the clever girl.  Here is what we have had:

This is the clever girl's first Halloween and I did not make this costume.  When I was pregnant with the clever girl, I called her "Pea", so when I saw this costume in a consignment shop, I grabbed it!  It was perfect!


In 2009, when the clever girl was 16 months, she was a ladybug.  I made her a tutu with strips of red and black tulle.  Her wings are red felt half-circles, stuffed, with black dots on the top.  Each wing had 2 elastic bands to go around her arms.

Friday, July 13, 2012

People Hand Puppets

For my last installment in the Puppet series, here are the people hand puppets!  For the puppet theatre and the animal puppets, see here and here.  When I was little, I had some hand puppets made by my parents.  (I come from a long line of crafty folks!)  My sister actually kept those puppets, so I asked her to mail them to me so I could use them as a go-by for making some for the clever girl.  Let me tell you, the puppets my parents made were seriously groovy.  I mean, without giving away too much, my sister and I played with these puppets in the 1970s, so you can just imagine what they looked like!  But one thing I really loved is that the girl puppet had big loop earrings and I thought that was just fantastic.  I still do, actually.  Those puppets were TINY.  I can scarcely get my hand into them now, so I knew I needed to make these puppets bigger so I could play with them too!

Thus started the puppet making process!  First I picked out some fun material for the bodies.  I used decorator fabric samples.  You could use any fabric, though I would shy from anything too thin.  You want them to be somewhat sturdy so you can really play!  For the insides of their mouths, I used a thin denim for 2 and a brown broadcloth for the other.  The tongues are a dark red felt.  Then I pulled out my button stash and picked out buttons for eyes.  Above you see the basic supplies.

Thursday, July 5, 2012

Animal Hand Puppets

I loved hand puppets as a child, so I decided to make the clever girl some for her birthday.  Surprisingly, when I Googled hand puppets, I got a lot of finger puppet tutorials and some more marionnette-like puppets, but few actual hand puppets!  Finally, I found an adorable pattern for a bunny hand puppet from The Purl Bee.  I copied the actual pattern at 90% to make it a bit smaller for a kiddo hand but still big enough for an adult hand.  While the bunny was perfect, I wanted other animals too, so I just used the body of the bunny and went wild! 

The patterns called for wool felt, but I could not find any and used acrylic instead.  Here is my little bunny.  The cutest part is actually the tail, which of course I did not photograph, but it is a sweet little pom-pom tail in the pink felt. 

Then I started to get crazy and made a cat.  I thought a solid cat was not fun enough, so I made it a striped kitty.  There are stripes on the back of the tail, and you can see the embroidery stitches from the front. 

And here is the puppy dog!  Again, there are spots on the back of the tail.

I love these puppets.  I actually intend to make her more, but ran out of time before her birthday.  I have the materials though for a lion, elephant, monkey, and giraffe.  The options are endless! 

This project was very fun.  Mr. Clever Mom and I worked on it together in the evenings after the clever girl was in bed.  Yep, you read that right!  He helped!  I had him cutting out the felt while I sewed the pieces together.  He actually has the basic body pieces cut for the other animals I want to make! 

The clever girl has had such fun with these puppets.  Along with the puppets, I also made her a puppet theatre  and some "people" puppets.  A post about the "people" puppets will follow!

Sunday, July 1, 2012

Puppet Theatre


I made the clever girl a puppet theatre and several puppets for her birthday!  Boy, oh, boy was it a hit!  It is simple to do and you even create a little bag to store the theatre in when you are done for the day!  Perfect!  The pattern is from Bend-the-Rules Sewing, by Amy Karol.  If you follow crafty blogs, you may know her as Angry Chicken.  She is brilliant.  (Seriously, you should check out her video tutorials, they are super!) 

The storage bag.

Saturday, June 23, 2012

Mermaids and Pirates Party - How to Antique Paper


The clever girl's birthday party is this weekend!  For the past few years, we have had a joint party with some friends of ours with a son born 1 1/2 weeks after the clever girl.  We have such fun at our joint parties that we both fear the day when our kids want their own!  Our friends have a pool, so each year we plan the party around swimming.  In Houston, summer birthdays must involve water.  It is too hot for anything else!  So we have had a luau party, an ocean party, and now a mermaids and pirates party!  I tend to get sort of carried away in party planning, so you can expect to see several posts about the party!

We came to the idea for a Mermaid/Pirate theme from our desire to do a treasure hunt.  I am responsible for creating the clues for the hunt and wanted to make them look old... like for a real buried treasure.  So I Googled "antiquing paper" and came up with a great tutorial!  A-ha!

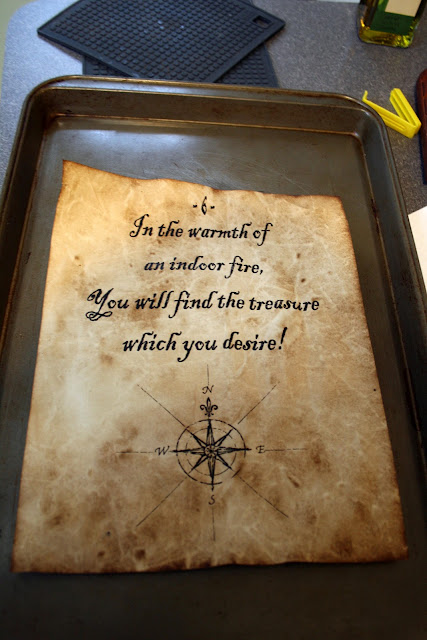
First I had to brainstorm the clues....  That was quite a task.  I made the mistake of starting when it was already late in the evening and I was exhausted from the day.  This does not tend to be the time when my creative juices are flowing very well.  So it took some work.  Also since our kids are turning 4, I needed to make the clues fairly simple.  Once I came up with the clues, I designed the pages using Microsoft Publisher.  You can use whatever publishing software you like, even Microsoft Word would probably work!  I found a graphic for a compass and a fun font and went to work!

So anyway, get whatever project you want antiqued, and use a LASER printer to print whatever you want on the paper.  Inkjet paper is water soluble, so that won't work.

Make some hot coffee.  This will sound outrageous to some, but neither my husband nor I are actually coffee drinkers.  Yes, it is true.  We are weird like that.  Nothing against coffee, we just don't have that particular craving.  So I used some instant coffee I keep on hand for random needs (mostly for making chocolate cake, but that is fodder for another post!)  Anyway, make up about a cup or so of hot coffee, depending on how many pages you intend to antique.

Take your beautifully printed paper and crumple it into a ball.  Now carefully un-crumple it and smooth it out.  Place it in a baking sheet bigger than your piece of paper.

Pour some coffee all over the paper.  You don't have to use a lot, but you do want all of the paper to get coffee on it.  I spread it around with my fingers, but you could also use a sponge brush or something, depending on how hot your coffee happens to be!

  Now sprinkle some instant coffee on top of the coffee mess (left photo).  Let this sit for a few moments, letting the coffee sprinkles start to dissolve a little bit. Take a paper towel and dab up the pooled coffee  and remaining coffee granules (right photo).

Put the baking sheet into the oven at 200F.  Bake your paper until you see that the paper is dry.  You can see that it is drying when the edges of the paper start to curl up.  The time on this will depend on the thickness of your paper, how much coffee you poured and how well you dabbed it all up.  It took each of my pages about 12 minutes.


Ta-da!  "Antique" paper!

Cool, huh?  My plan is to roll up my clues and stick them out of clean (as in washed out and no label) brown or green beer bottles and place them in the appropriate places at my friend's house.  My husband has had the job of drinking the beer this week to provide the bottles.  He was glad to help!

Update:
Here are the clues in the bottles ready for the treasure hunt!  I rolled up the pages on the diagonal starting from the bottom left corner, and rolled them fairly tightly to get into the neck of the bottles. 

In some of the bottles the clues were harder to remove, almost like a suction was created, and the kids had to turn the paper the direction of the roll to get them out.  I am not sure why that happened but it certainly didn't diminish the excitement of the treasure hunt!  It was a BLAST.    The kids loved it and were ALMOST sad to find the treasure, as that meant the hunt was over.  Our treasure was a little treasure chest filled with beads and chocolate coins.  Once the excitement of the treasure hunt was over, we divided up the treasures and sent a bag home with each guest.