Showing posts with label beef.. Show all posts

Friday, August 29, 2014

Amazing Turkey Lasagna

I just made the yummiest lasagna!  So I had to share it with you right away so you can make it too! Everyone seems to have their favorite lasagna recipe, but I promise you, this one is truly special.  It is from Ina Garten, and I rarely ever go wrong with her recipes!  First of all, she uses turkey Italian sausage, so you can feel very proud of your healthy dinner and just forget about all of that cheese, okay?  I mean, surely the use of turkey instead of pork sausage outweighs some of that yummy cheese??  Honestly, I think what makes this lasagna so delicious is the addition of some creamy goat cheese in the middle.  Mmmm.  And there is a whole new brilliant way of "cooking" the noodles that is so easy!  Ready to hear more?  Read on!

The sauce for this lasagna incorporates the turkey sausage, instead of using sauce and then layering the sausage on the cheese or something.  Smart, I think.  I think next time I might even use more sausage, just to boost the meaty/protein element of this lasagna.

Are you ready for how to cook the noodles?  It is brilliant and it WORKS, I tell you.  Instead of dumping the noodles into boiling water and trying to get them out at that perfect al-dente texture and then dumping them into a colander to cool without breaking them all to pieces, this recipe has a smart new way.  Find a large bowl.  I used the biggest mixing bowl I have and next time I might just use my big broiling pan so the noodles can lay flat.  You fill that bowl with the hottest TAP water you can.  Then add the noodles to the bowl and let them sit in the water for 20 minutes.  Done.  My noodles had troubles being totally submerged in my large mixing bowl (it just wasn't quite wide enough).  If this happens to you, no worries.  Place something heavy on the top of the noodles to hold them down.  I used a glass jar filled with my pie weights.  After about 10 minutes, I removed the jar and gently flipped the noodles around, so the ones that were on top were now on the bottom of the bowl, and then put the jar back on top.  After 20 minutes, the noodles were still fairly stiff but softened the right amount.  I will NEVER cook lasagna noodles in boiling water again!  Or use the "no bake" ones!  This is easy!

I prepared the lasagna in the morning and just threw it in the oven for dinner!  Easy.  And I have to say that this recipe is pretty forgiving, as at SOME UNKNOWN POINT during the baking of the lasagna, the clever boy stood up at the stove and TURNED OFF the heat.  He is totally fascinated by the oven/stove right now and those knobs are right in his reach when he stands up.  I need to figure out how to prevent this from happening again!  Anyway, when my timer went off, I realized that the lasagna was not only not bubbling, but that the oven didn't seem very hot.  Ugh.  So I turned the oven back on and let it cook for a bit more.  I had no idea how long it needed to go, but it worked!  Phew!  Dinner was delayed a bit but it was still delicious! 

Are you ready for the entire recipe?  Here you go!

Turkey Lasagna
adapted from Ina Garten

Ingredients:
2 tablespoons olive oil
1 cup chopped yellow onion (1 onion)
2 garlic cloves, minced
1 1/2 pounds sweet Italian turkey sausage, casings removed
1 (28-ounce) can crushed tomatoes in tomato puree
1 (6-ounce) can tomato paste
1/4 cup chopped fresh flat-leaf parsley, divided
1/2 cup chopped fresh basil leaves
2 teaspoons kosher salt
3/4 teaspoon ground black pepper
1/2 pound lasagna noodles
15 ounces ricotta cheese
3 to 4 ounces creamy goat cheese, crumbled apart
1 cup grated Parmesan, plus 1/4 cup for sprinkling
1 XL egg, lightly beaten
1 lb fresh mozzarella, thinly sliced

Directions:
Preheat your oven to 400F.  Get out a 9x12x2-inch rectangular baking dish.

Heat the olive oil in a large skillet over medium-low heat.  Add the onion and cook until translucent, about 5 minutes.  Then add the garlic and cook for 1 minute before adding the sausage.  Break up the sausage into small chunks, and cook until the sausage is not pink, about 8-10 minutes.  Add the tomatoes, tomato paste, 2 TB parsley, basil, 1 1/2 teaspoons of the kosher salt, and 1/2 teaspoon of the pepper.  Allow to simmer, uncovered, for 15-20 minutes.  The sauce will thicken.

Meanwhile, fill a large bowl or pan with the hottest tap water.  Submerge the noodles and let them soak for 20 minutes.  Drain.

Combine the ricotta, goat cheese, 1 cup Parmesan, egg, remaining 2 TB parsley, remaining 1/2 teaspoon kosher salt and remaining 1/4 teaspoon black pepper.  Set aside.

Ladle 1/3 of the sauce into the bottom of the baking dish, spreading it all over the bottom of the dish and into the corners.  Start to layer the lasagna:  1/2 of the noodles, 1/2 of the mozzerella slices, 1/2 of the ricotta mixture, and 1/3 of the sauce.  Repeat the layering, ending with the sauce.  Sprinkle the top with 1/4 cup Parmesan cheese.  Bake for 30 minutes, until the sauce is bubbling.
Printable Recipe


I am honestly not sure I'll make another lasagna again.  You can definitely adapt this recipe however you want.  You could remove the sausage and use some portobello mushrooms for a vegetarian option.  And add lots of different veggies in the layering if you wanted.  I would probably cook the veggies a little first, as this lasagna only cooks for 30 minutes so you might want to give the veggies a head start.  I would not change the cheese though.  Fresh mozzerella and goat cheese with ricotta and Parmesan?  That is some yummy, creamy, cheesy goodness right there!  This recipe was a huge hit!  Even as leftovers!  My family will definitely be seeing this again!

Saturday, July 5, 2014

Italian Meatballs with Creamy Polenta

After the clever girl's dance recital, we went to one of our favorite Italian restaurants to celebrate/relax.   The recital was tons of fun for the clever girl, and lots of work for me!  She had 2 costume changes which is a lot of running back and forth to the back-stage area, trying not to break my neck in the dark.  But why we (i.e. I) really needed to relax is from the make-up situation.  Yes, for the dance recital, the clever girl has (HAS would be my word, GETS would be hers) to wear makeup.  And we aren't just saying a tad bit, it's, well, a lot, by my standards.  Powder, blush, eye shadow, mascara, and the dreaded/beloved (again, a perspective thing) "Cherries in the Snow" lipstick.  This is by the request of the dance studio, of course.  If you aren't part of this particular dance studio, you probably are not familiar with Cherries in the Snow.  Because, honestly, I can't for the life of me figure out what grown woman would wear this color lipstick.  It is a BRIGHT red/fuschia color.  And when you apply it to your little 6yr old girl, the look is shocking.  Kind of a "how to make your child look like a... " well, let's not go there, but I think you probably get the drift.  The first time we put it on the clever girl, she even said that it needed to be toned down a bit.  Okay?  Anyway, after the hair is done (no fly-aways!!) and the make-up is applied, my innocent little girl looked about 16 years old, and my future flashed in front of my eyes.  It was scary!  As you can see, I am still a bit traumatized by the situation. 

Are you wondering what this has to do with meatballs?  I'll tell you, I promise.  We went to the yummy Italian place for dinner, where the clever boy absolutely went to town on these giant meatballs that we ordered.  He LOVED them.  A-HA!  I thought.  I must make giant meatballs!  I decided to serve them with creamy polenta because, well, it's a really great idea and because the clever boy loves polenta as well.  Win-win dinner plan!

After lots of research into the best Italian Meatball recipe, I settled on the recipe below.  Though many swear by using beef, pork and veal in meatballs, I have a THING about veal so I needed a 2-meat meatball.  These were perfect!  Don't be alarmed by the long list of ingredients - they are easy to find and the recipe is pretty easy and fast to put together!

Italian Meatballs
adapted from Simply Recipes
Makes about 16 meatballs

Ingredients:
Meatballs
1 pound ground beef (at least 16% fat)
1 pound ground pork
2/3 cup milk (whole or 2%)
3 slices of white bread, crusts removed
1/4 cup ricotta cheese
1/4 cup grated parmesan or romano cheese
2 eggs
2 teaspoons Kosher salt
1 TB chopped fresh parsley
2 teaspoons ground black pepper
1 teaspoon dried oregano
2-3 garlic cloves, minced
about 1 cup flour, for dusting
1/3 cup olive oil
2 1/2 cups (24 oz.) tomato sauce (your own or use following recipe)

Tomato Sauce
2 TB olive oil
3/4 cup finely chopped onions
3/4 cup finely chopped carrots
3/4 cup finely chopped celery
2 TB chopped fresh parsley
1 garlic clove, minced
1 28 -oz. can crushed or whole tomatoes, including the juice (I recommend using San Marzano tomatoes if you can find them)
1/2 teaspoon dried basil or 2 TB chopped fresh basil
2 teaspoon tomato paste
salt and freshly ground pepper to taste

Directions
If you are using the above recipe for tomato sauce, start with that.  The sauce will simmer while you prepare the meatballs.  Heat the olive oil in a large skillet over medium heat.  Add the onions, carrots, celery and parsley (I chopped them all together in the food processor).  Stir to coat with the oil, reduce the heat to low, and cover the pan.  Cook until the vegetables are soft and coked through, about15-20 minutes.  Remove the cover, add the garlic, and increase the heat to medium-high.  Cook the garlic for 30 seconds and then add the tomatoes.  If you are using whole canned tomatoes, break them up with your fingers as you add them, otherwise just dump in the can of crushed tomatoes.  Add the tomato paste and basil and season with salt and pepper.   Bring to a low simmer, reduce the heat to low, and allow to cook uncovered until thick 15-30 minutes.  Puree the sauce in a blender or food processor, or push through a food mill, and pour it back into the large skillet.

For the meatballs:  Heat the milk in a small saucepan until steamy.  Turn off the heat, tear the bread into little pieces, and soak it in the milk until the bread partially dissolves.  Mash the bread until it is paste-like.  Pour it onto a plate to cool.

In a large bowl, combine the meats, cheeses, eggs, salt, herbs, pepper, garlic and the bread-mixture (all of the ingredients ABOVE the flour for dusting).  Mix well with your hands until it barely combines.  Don't overwork the mixture, this will make for tough meatballs!  It's ok to have some clear bits of bread or meat in the mix - better than than tough meatballs.

Pour the flour into a pie pan or other flat dish.  Wet your hands and form meatballs.  A traditional size is 2-3 inches.  Mine were closer to 3+.  Once the meatball is rolled in your hands, roll it in flour.   Set each floured meatball on a baking sheet as you finish the other meatballs.

When all of the meatballs are ready, heat olive oil in a large skillet over medium-high heat.  Brown the meatballs on at least 2 sides.  They will continue cooking in the sauce, so don't worry about getting them all the way done.

Arrange the browned meatballs in the sauce, turning each one over so it is coated.  Cover and simmer gently for 15-20 minutes.  Serve with the sauce and creamy polenta!
Printable Recipe

Creamy Polenta
adapted from The Kitchn
Makes about 4 cups

Ingredients
4 cups water
1 teaspoon salt
1 cup polenta or yellow cornmeal
1 cup cheese (optional)
1-3 TB butter (optional)

Directions
Bring the water to a boil and add the salt.  Pour the polenta into the boiling water while whisking constantly.  Turn the heat down to low and continue to whisk as the polenta thickens.  Cover the pan and cook for 30-40 minutes, stirring vigorously every 10 minutes or so.  Make sure you scrape down the sides and around the corners of the pan.  If you are using cheese and butter, add this after the polenta is at the consistency that you prefer.  Serve immediately, or cover and let sit for up to 15 minutes before serving. 
Printable Recipe
 
Yum.  Happy baby, happy family!  This is great comfort food!  The meatballs are nice and soft in the middle, but a bit of a crisp on the outside.  The tomato sauce is really flavorful and quite good.  Serve it all on a bed of creamy cheesy polenta and it is happiness on a plate!  This is a wonderful way to recover from any particular stressful situation.  Add a glass of red wine (or not if you prefer) and you have taken a giant step in the direction of AHHHHH.  I wish for you to have more time in bliss, and to never have to experience the Cherries in the Snow!

Tuesday, August 6, 2013

TWD: Baking with Julia - Eastern Mediterranean Pizzas

This week's TWD recipe is Eastern Mediterranean Pizza!  You start with a pita bread and then put yummy toppings with an eastern Mediterranean flair and there you go!  Eastern Mediterranean Pizza! 

I rather liked the pita dough.  It was simple enough to make and used both white and wheat flours, which I like.  The dough itself starts with a sponge that can rest for 30 minutes up to 8 hours.  I let mine rest for about 4 hours.  The flavor was quite good, so I do wonder what it would be like if I had the time to let it rest the entire 8 hours, and if I only let it rest for 30 min...  I hope some of the other bloggers share their thoughts on that one! 

The toppings to this "eastern Mediterranean" pizzas are shallots, garlic, lamb and tomatoes.  This is mixed with some cinnamon, allspice, salt and pepper for the Mediterranean flair.  I did not use lamb.  I just don't like it.  I don't like the idea of lamb, and I don't generally care for the taste.  Lamb is just not my thing!  Early on when I first started dating my husband, I went to his parent's house for dinner and was served lamb with mint jelly.  I know lots of people love this combination.  I truly don't get it.  Mint jelly?  Blech.  On MEAT?  Ack.  Anyway, as a newbie in the family unit (we were only dating!) I forced myself to eat what I could.  Unfortunately for me (but fortunately for my husband since I won't cook lamb) his parents love lamb and cook it often.  I, however decided that once we were married, I did not have to eat lamb any more.  And I haven't!  And if his parents have noticed, they must not care.  (They will notice now though, as my father-in-law follows my blog!!)  It's all just personal taste, right?

So, to end my long story about lamb, I did not use it in these pizzas, I used ground sirloin instead.  You just cook the shallots, garlic, meat and tomatoes together, add the spices, and plop some on each pita circle (8 total).  Sprinkle pine nuts on top (I love pine nuts) and into the oven they go for about 7-8 minutes.  Done!

We liked them, but mine would probably have been better if I had used (gasp) canned tomatoes.  I used fresh ones and they didn't have much flavor.  Pitiful to think canned ones would have been better, isn't it? 

Gotta run - off to visit  the in-laws....  I hope there isn't any lamb!!!

Thursday, April 18, 2013

Balsamic Roast Beef

Interested in a really great slow cooker recipe?  Look no further.  This Balsamic Roast Beef is flat-out delicious!  And it is super easy.  Throw the ingredients into your crock pot, let that crock pot do it's job, and in 6-8 hours (if you cook it on low) dinner is ready!  It is that simple and is REALLY good. 

Balsamic Roast Beef
adapted from Add A Pinch
Serves 6-8
1 3-4 pound boneless roast beef (chuck or round roast)
1 cup beef broth
½ cup balsamic vinegar
1 tablespoon Worcestershire sauce
1 tablespoon soy sauce
1 tablespoon honey
½ teaspoon red pepper flakes
4 cloves garlic, chopped

Place the beef in your slow cooker insert.  Mix together the remaining ingredients in a 2-cup measuring cup or a small bowl.  Pour over the beef and set the cooker for 4 hours on high or 6-8 hours on low.

With tongs, remove the cooked beef from the cooker and place in a serving bowl.  Break it apart a bit with 2 forks and then ladle 1/4 cup to 1/2 cup of the remaining sauce over the beef.  Or, for more pronounced flavor, skim the sauce and put it into a small saucepan on the stove.  Heat over medium-high heat until the sauce is reduced by half.  Pour this over the beef. 

Dinner?  DONE!  Throw together some side dish and you have an amazing meal! 

Sunday, September 30, 2012

Daring Bakers: Empanada Gallega

September's Daring Bakers Challenge was an Empanada Gallega!  Patri of the blog, Asi Son Los Cosas, was our September 2012 Daring Bakers hostess and she decided to tempt us with one of her family's favorite recipes for Empanadas!  We were given two dough recipes to choose from and encouraged to fill our empanadas as creatively as we wished!

I am a bit late with this post (was supposed to post on September 27) but I wanted to make the empanada anyway!  I have made empanadas before but they tended to use some sort of pie crust and though tasty, I could never get past the idea that I was eating a TON of pie crust with each piece.  So the idea of making my own empanada dough was too tempting to pass up!

Making the dough was downright simple!  The recipe is very straightforward and it creates a dough that is both tasty AND easy to work!  (Gotta love that combination!)

Empanada Gallega with Ground Beef
3 1/2 cups (500 gm) all-purpose or bread flour (I used bread flour)
1 cup (240 ml) warm water
1/2 cup less 1 TB (100 ml) liquid fat  - oil, margarine, lard, etc.  (I used olive oil)
1 TB (15 gm) dry yeast or 1 oz (30 gm) fresh yeast
1 teaspoon (5 ml)(6 gm) salt
1 teaspoon (3 gm) sweet paprika

Put the flour into a bowl and make a well in the middle.  Add all of the ingredients.  If using fresh yeast, break it up as much as possible.  Mix with a wooden spoon until all of the ingredients have been incorporated.  Turn dough onto a floured board/counter and knead for 8 minutes.  Make a ball and place in an oiled bowl.  Allow to rise covered with a towel for about 1/2 hour before using. 

(make filling while dough is rising)

One risen, put the dough back onto a parchment covered, floured board/counter and divide it in half.  Cover one half with the towel to prevent drying.  Spread the other half of the dough using a rolling pin.  Depending on the shape of your oven pan or cookie sheet, you will make a rectangle or a round shape with your dough.  Roll the dough to a thickness that depends on your filling and the amount of dough you like in each bite.  For your first time, make it about 3 mm thin (about 1/10th of an inch) and then adjust from there in the next empanadas you make.

Filling
adapted from The Best Simple Recipes, America's Test Kitchen
1 pound lean ground beef
1 onion, chopped fine
2 TB tomato paste
4 garlic cloves, minced
1 teaspoon ground cumin
1 cup shredded Monterey Jack cheese
1/4 cup finely chopped fresh cilantro
salt and pepper

Cook beef and onion in a large nonstick skillet over medium-high heat until beef is no longer pink, about 5 minutes.  Add tomato paste, garlic and cumin and cook until fragrant.  Off heat, stir in cheese and cilantro.  Season with salt and pepper.  Allow filling to cool before putting it on the empanada dough.

Preheat your oven to 350F.

If you used the parchment paper mentioned above, place it with your rolled out dough on a baking sheet.  Place the cooled filling on top, leaving about an inch of dough around the outside.  (Note:  the reason for using cooled filling is so that the bottom layer of the empanada doesn't get soggy!) 

Roll out the other half of the dough on a second flour-covered parchment paper.  This "top" dough needs only to cover the filling, so it will be smaller BUT THE SAME THICKNESS as the bottom dough.  This is a good opportunity to trim off some of your dough to use for decorating the top of your empanada!  Carefully flip your top dough over the filling and peel off the parchment paper. 

Using your fingers, join the bottom and top dough, pinching the top and bottom together with your thumb and index finger and turning them half-way in.  This is how you end up with a rope-like border.  If you desire a video on this technique, check out http://youtu.be/CNpB7HkTdDk.  When the border is complete, make a 1 inch hole in the middle of the top layer of dough.  This helps hot air exit the empanada while baking.  Use the left over dough to decorate the empanada!

Prick the top layer of dough with a fork and cover with an egg wash.  Bake for 45 minutes.
Printable Recipe

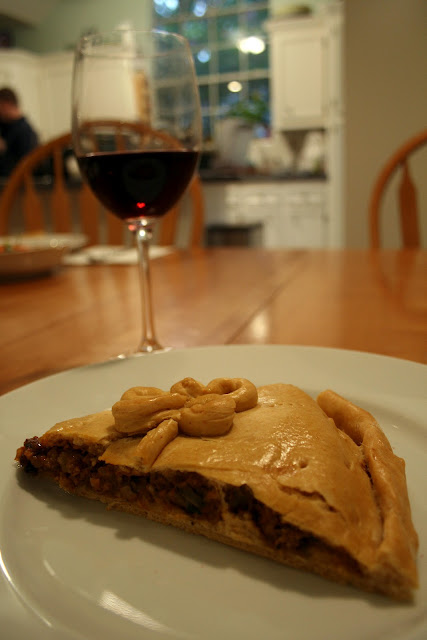
As you can see in the photo above, my empanada opened up a little bit on the bottom edge, so my rope making skills were not spot-on.  Oh well!  The empanada itself was delicious!  The filling is very tasty, especially with the fresh cilantro.  The dough was great!  The flavor is really good, and that sweet paprika really makes it perfect.  I like the thickness I rolled, which was probably about the thickness of a quarter.  Though the dough recipe says it serves 6, and the filling recipe says it serves 4, I would say mine would serve 8! 

This seems like a long recipe but really it is quite simple.  The filling is made while the dough rises, so you could make this well in advance and just roll out the bottom layer when you are ready to bake!


Definitely a keeper for my family!  Many people in the Daring Bakers group made sweet empanadas, using fruit fillings, which is another great option!

Enjoy!

Sunday, September 2, 2012

Spiced Beef Corn Bread Cobbler

For me, this is a pantry meal.  Meaning, I don't have to get anything special from the grocery store, I generally have all of the ingredients on hand.  It's perfect for those times when I need to get to the grocery store but haven't had a chance, and I need to come up with a quick dinner plan!

Spiced Beef Corn Bread Cobbler
adapted from Epicurious

Makes 4 (main course) servings

1 medium onion, chopped
1-2 carrots, diced
4 TB vegetable oil (I use olive oil)
2 garlic cloves, finely chopped
1 pound ground beef chuck
1 teaspoon sugar
1/2 teaspoon ground cinnamon
1/2 teaspoon cayenne
1/4 teaspoon ground allspice
1/4 teaspoon black pepper
3/4 teaspoon ground ginger
1 1/4 teaspoons salt
1 (14- to 15-ounce) can diced tomatoes in juice
2/3 cup yellow cornmeal
1/3 cup all-purpose flour
2 TB sugar
1 teaspoon baking powder
1/3 cup whole milk
1 large egg
2 ounces coarsely grated sharp Cheddar (1/2 cup plus 2 tablespoons)

Put oven rack in middle position and preheat oven to 400°F. Lightly oil a 9 1/2-inch (6-cup capacity) pie plate. 

Cook onion and carrots in 2 tablespoons oil in a deep 10-inch saute pan over moderate heat, stirring occasionally, until edges are golden, 3 to 4 minutes. Add garlic and cook, stirring, 1 minute. Add beef and cook until no longer pink, breaking up large lumps, 4 to 5 minutes. Add 1 tsp. sugar, spices, and 1 teaspoon salt and cook, stirring, 1 minute. Add tomatoes with juice and briskly simmer, stirring occasionally, until liquid is reduced to about 1/4 cup, 8 to 10 minutes. 

While beef cooks, whisk together cornmeal, flour, 2 TB sugar, baking powder, and remaining 1/4 teaspoon salt in a medium bowl. Whisk together milk, egg, and remaining 2 tablespoons oil in a small bowl, then stir into cornmeal mixture until just combined. Fold in 1/2 cup cheese. 

Spoon cooked spiced beef into pie plate with a slotted spoon, reserving juices in skillet. Skim off and discard fat from juices if desired, then pour juices over beef in pie plate. 

Spread corn bread batter over beef, then sprinkle remaining 2 tablespoons cheese over batter. Bake until a wooden pick or skewer inserted into center of corn bread comes out clean, 15 to 25 minutes.
Serve cobbler warm. 

This reminds me of a southern version of a sloppy joe.  The spices in the beef mixture are really nice, and the cornbread gives that home-y slightly sweet taste to complement the spices.  Yum!