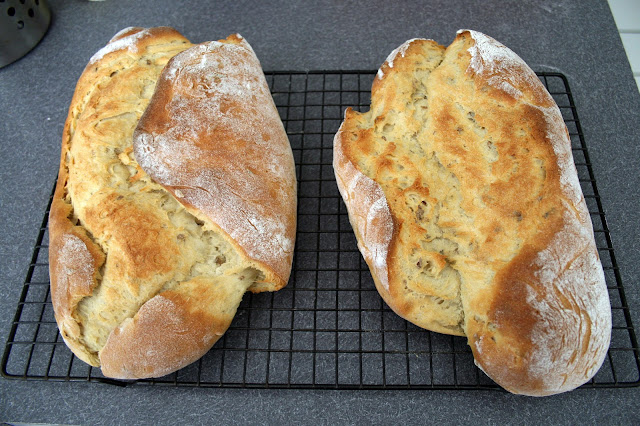
This week's recipe for Tuesday's with Dorie is Rustic Potato Loaves, on pages 138-139 of Baking with Julia. I have to say, if you have any interest in baking bread, this is one to try! It is fairly quick to make (just two rises of 20 minutes each) and the end result is simply delicious!
Obviously, the main ingredient of this bread is potatoes, so the first thing you do is boil some potatoes until they pierce easily with a fork. When they are done, reserve 1/2 cup of the potato water and then drain the potatoes. Sit the potatoes on a cooling rack over a jelly roll pan and allow to completely cool.

Mix a tablespoon of yeast in with the potato water and let it sit for a few minutes to get creamy.
Put the cooled potatoes in the mixer and mash with the paddle attachment. Add the yeast mixture and some olive oil and then switch to the dough hook attachment.
Add the flour and some salt and start to beat. The directions actually say that the dough will be transformed from dry and lumpy to smooth and soft, and that you just need to "have faith and keep beating". Well, the book was right! I watched as the dough went from lumps to this amazing soft dough! I had to actually stand there and watch, because that much dough in the mixer makes the poor mixer want to dance around a bit so I held her so she couldn't dance right off of the counter!
Cover the mixer bowl and let the dough rise for 20-30 minutes.
After the dough has risen (it may not double but it does rise quite a bit) take it out, cut it into two pieces, and shape/roll them into these torpedo shapes. Let them sit on a floured towel for another 20 minutes, covered with another towel.
In the mean time, move your oven rack to the very bottom of the oven and place a large baking stone on the rack, leaving about 1 inch between the stone and the oven walls. Get a spray bottle ready with some water, and preheat the oven to 375F. Also, sprinkle some cornmeal or flour on a baking peel or baking sheet for getting the loaves into the oven.
After the torpedos have risen for about 20 minutes, move them to the baking peel or baking sheet. Open the oven and spray the walls with water, slide the loaves onto the baking stone, and spray the walls with water again. Close the door quickly. Bake for 45-50 minutes, until the center of the bread is 200F.
Let the bread cool for at least 20 minutes while you enjoy the amazing smell of your kitchen. My loaves came unwrapped a little bit, so they aren't as pretty as the picture in the book, but that is okay with me. Next time I'll just make sure I pinch the dough closed a bit better.
This bread is so yummy! It has a crunchy outside and an amazingly soft and moist inside. The flavor is almost nutty. It would be great as a sandwich or as toast, or with a bit of cheese, or just by itself!
I am really shocked as to how easy this bread was to make, and how tasty it turned out! Yahoo! Bread success!
If you would like the recipe, please visit our host's blog, Dawn of Simply Sweet. Try this recipe! You will be amazed!


Agree this bread is easy and tasty. And as my beach side adventures prove, very, very forgiving as well. I think the slightly unwrapped bread adds to the rustic look!
ReplyDeleteYes! This bread is yummy. I love how rustic they look....makes me think of great bakeries. I loved this recipe and will be making it often. It is just so nice to make bread and make bread quickly.
ReplyDeleteLovely torpedoes! Glad you enjoyed the bread as much as we did - this recipe will be definitely repeated in our kitchen :)
ReplyDeleteYep, I had to hold mine KA down at first too.
ReplyDeleteBeautiful loaves!
Great rustic looking loaves. It is always great when a recipe turns out well.
ReplyDeleteOk, I'll definitely have to try it!!
ReplyDeleteI think your loaves look great. This is one of those recipes that we'll definitely be revisiting, too.
ReplyDeleteI did like the simplicity of this recipe, and it looks like it takes a lot longer to make than it actually does. Great looking loaves you made - it's a keeper recipe for us!
ReplyDeleteBoth of those loaves are gorgeous. Perfectly rustic slits. This was good, wasn't it.
ReplyDelete